
How To
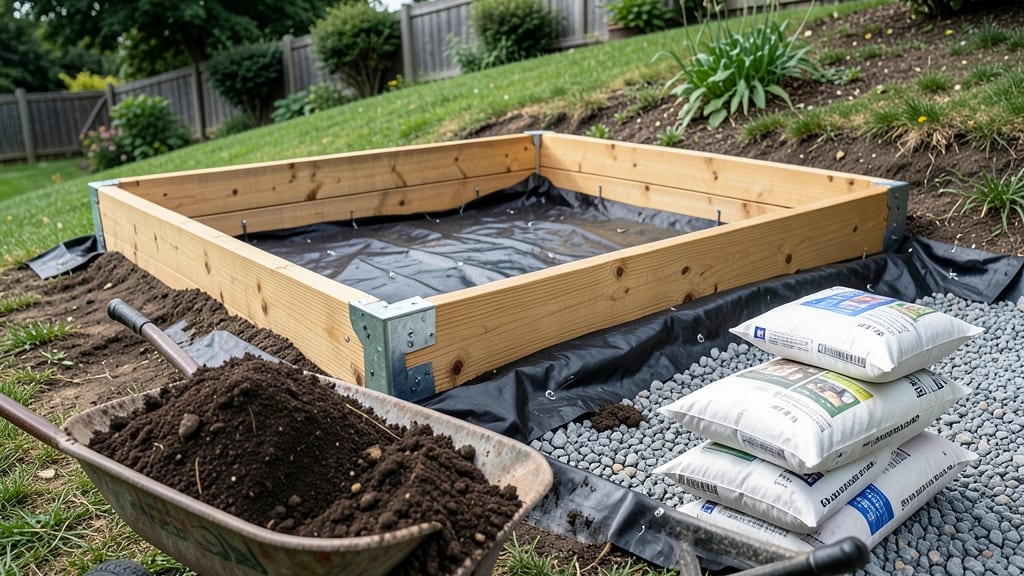
Building a raised bed on a slope feels like solving a puzzle—except your "pieces" are lumber, gravel, and gravity. 🌱 The key is working with the incline, not against it, by creating gentle terraces that prevent erosion while giving plants room to thrive.
My first attempt ended with a wobbly, sinking bed that collected water like a swamp, but this method? It stays put.
You’ll need 2x6 lumber (or cedar for rot resistance), landscape fabric, gravel for drainage, and corner brackets to keep everything square. The slope itself becomes your ally: by cutting notches into the bed’s base, you let it nestle into the hillside like a built-in planter.
No digging means no back strain, and the terraced design lets water drain away instead of pooling.
Once built, your beds will look like they’ve always belonged there—neat, stable, and ready for whatever you plant. The first layer of gravel ensures nothing rots, while the fabric keeps weeds from creeping up from below. By summer, you’ll be harvesting without worrying about mudslides or sinking soil.
Pro tip: Start small (4x8 feet works perfectly) and use treated lumber if cedar isn’t in your budget—just avoid pressure-treated wood near edible plants. For steeper slopes, add a third support layer or consider a retaining wall system. Either way, your garden will stay put.
📚 In This Guide
- What you need
- Instructions
- Tips and common mistakes
- Wrapping up and next steps
What you need
- ● Raised bed frames: Untreated lumber (cedar, redwood, or composite) – 2x6s or 2x8s, 8–12 ft long (quantity depends on bed size; e.g., 4–8 pieces for a 4x8 ft bed).
- ○ Optional: Corner brackets or screws for extra stability.
- ● Hardware: Galvanized or stainless steel screws (3–4 inches long) – ~50–100 screws (depends on frame design).
- ○ Galvanized nails (optional, for extra reinforcement).
- ● Landscaping fabric: 1–2 rolls (to prevent weeds and retain soil).
- ● Cardboard or landscape fabric: 1–2 sheets (to smother weeds before building).
- ● Soil & amendments: Topsoil – ~1 cubic yard per 4x8 ft bed (6–12 inches deep).
- ● Compost or aged manure – ~1–2 bags per bed.
- ○ Optional: Gravel or crushed stone (1–2 bags) for drainage layer.
- ● Tools: Circular saw or handsaw (for cutting lumber).
- ● Drill/driver (for screws).
- ● Level (to ensure even placement on the slope).
- ● Measuring tape, pencil, and chalk line (for marking cuts).
- ● Wheelbarrow (for hauling soil).
- ● Shovel and garden rake.
- ● Staple gun (for securing landscape fabric).
- ● 🌡️ Check slope stability: Ensure the area can support the weight of soil and wood (avoid loose or eroded ground).
- ● ✨ Terrace in layers: For steep slopes, build beds in staggered tiers (like stairs) for drainage and support.
- ● 🔧 Pre-drill screws: Prevents wood splitting and makes assembly easier!
Step-by-step instructions for building a raised bed on a slope
Here's how to create stable, functional terraces that prevent erosion and give you growing space—no backbreaking digging required.
🪴 Step 1: Assess the Slope and Mark Your Layout
Start by walking the slope and identifying where water naturally collects—these spots will need extra support. Use a 4-foot level to check for unevenness, then mark your bed's outline with stakes and string. I like to keep beds 4 feet wide for easy access from both sides, with lengths determined by your slope's natural contours. The key is to follow the land's natural flow rather than forcing straight lines.
Measure the slope's angle with a slope gauge or simple string and ruler method: stretch a string level along the slope, then measure the vertical rise over a 10-foot horizontal distance. A 5-10% grade (about 1-2 inches per foot) is ideal for raised beds—steeper slopes will need additional support. If your slope is too steep, consider breaking it into shorter, wider terraces instead of one long bed.
🪴 Step 2: Build the Frame with Corner Posts and Leveling
Drive 4x4 pressure-treated posts into the ground at each corner, burying 12-18 inches deep for stability. Use a post hole digger to create holes slightly wider than the posts. For slopes over 15% grade, add an extra post every 3-4 feet along the downhill side. Connect the posts with 2x6 lumber, screwing from the inside of the frame to hide fasteners and prevent wood rot.
Check for level in two directions: horizontally across the bed and diagonally from corner to corner. Adjust by cutting posts to length or adding shims (thin wood strips) under the frame. I like to use a laser level for precision, but a string level works too. Once level, pre-drill holes and secure the frame with deck screws—this prevents wood from splitting and ensures long-term stability.
💧 Step 3: Add Retention and Drainage Layers
Line the inside of the frame with landscape fabric to prevent soil from washing out. For slopes, add a retaining edge along the downhill side using corrugated metal flashing or landscape timbers screwed into the frame. This catches soil and reduces erosion. Fill the bottom 6 inches with coarse gravel or crushed stone for drainage—critical on slopes where water pools easily.
Next, add a 4-inch layer of hardwood mulch or straw over the gravel. This acts as a root barrier and further stabilizes the soil. If your slope is prone to heavy rain, consider adding a French drain along the downhill edge: bury a perforated pipe surrounded by gravel to divert excess water away from the bed.
✂️ Step 4: Fill and Stabilize the Raised Bed
Fill the bed with equal parts topsoil, compost, and aged wood chips (or use pre-mixed raised bed soil). I like to start with 6 inches of soil, then add more as plants grow. Tamp the soil lightly with a board or tamper to eliminate air pockets, but don’t compact it too tightly—roots need room to spread. For slopes, add straw bales or erosion control blankets along the downhill edge until plants establish roots.
Plant deep-rooted ground covers like creeping thyme or clover along the downhill side to further stabilize the soil. Avoid heavy annuals until the bed is fully settled—light, fibrous plants won’t pull the soil apart. Water the bed deeply after filling to help the soil settle and eliminate gaps. If the soil shifts after watering, add more mulch or straw to reinforce the edges.
🌱 Step 5: Maintain and Adjust Over Time
Check the bed’s stability after the first heavy rain—look for soil slumping or water pooling. If needed, add more gravel or mulch to reinforce the downhill side. Top off the soil with 2-3 inches of compost every spring to maintain fertility and structure. On steep slopes, consider installing terrace risers (pre-made or DIY) to create step-like levels for better water control.
Monitor plants for signs of stress, like yellowing leaves or stunted growth—these often indicate drainage issues. If water pools in one corner, dig a small trench to redirect flow. Over time, the bed will settle, so plan to add 1-2 inches of soil annually to keep plants thriving. With proper maintenance, your slope-turned-garden will stay stable for years.
Tips & tricks for building a raised bed on a slope
Common pitfalls—and how to sidestep every one. The difference between a stable terrace and a muddy mess often comes down to these small but critical details.
Slope Assessment: Don't guess the grade! Use the string and ruler method from Step 1 to get precise measurements. A 5-10% grade (about 1-2 inches per foot) is ideal, but if you're working with steeper terrain, consider breaking your project into multiple shorter, wider terraces instead of one long bed. This prevents soil slippage and makes maintenance much easier. I always sketch my layout first—it helps visualize how water will flow after heavy rain.
Frame Stability: For slopes over 15% grade, add those extra posts every 3-4 feet along the downhill side—this isn't optional, it's essential. I've seen beds fail when people skip this step, especially after the first heavy rain. When securing your frame, pre-drill holes before screwing to prevent wood from splitting. This might seem like overkill, but it'll save you headaches down the road when storms test your construction.
Drainage is Non-Negotiable: That 6-inch gravel layer in Step 3 isn't just for looks—it's your first line of defense against erosion. On particularly steep slopes, consider upgrading to a French drain along the downhill edge. I've seen beds where water pooled and turned to mud within weeks because this critical step was skipped. If you're unsure about your slope's drainage, dig a small test trench first to see how water naturally flows through the soil.
Soil Settlement: After filling your bed with the 6 inches of soil mix, water it thoroughly and let it settle for 24 hours before planting. This might seem counterintuitive, but it prevents future compaction issues. I've learned this the hard way—planting too soon can lead to uneven settling, where one side of the bed sinks while the other stays level. If you notice this happening, add more gravel or mulch to the lower side to reinforce it.
Pro Tips for Build A Raised Bed On A Slope
- Common pitfalls—and how to sidestep every one. The difference between a stable terrace and a muddy mess often comes d...
- Slope Assessment: Don't guess the grade! Use the string and ruler method from Step 1 to get precise measurements. A 5...
- Frame Stability: For slopes over 15% grade, add those extra posts every 3-4 feet along the downhill side—this isn't o...
Frequently asked questions
Got questions about tackling that tricky slope? You’re not alone—here are the answers to the most common concerns when building raised beds on uneven ground.
Can I build raised beds on a steep slope without terraces?
Yes, but with adjustments! For slopes under 15°, simple raised beds with leveling layers (gravel, sand, or pavers) work. Steeper slopes (15–30°) need terraces or retaining walls to prevent erosion. For extreme slopes (30°+), consider contour planting or swales instead of traditional beds.
What’s the best time of year to build raised beds on a slope?
Spring or early fall is ideal—soil is workable, and you avoid extreme heat/cold. Winter builds are possible in mild climates, but compacted ground may require extra prep. Avoid rainy seasons unless you’re using effective drainage (like gravel bases) to prevent muddy messes.
Are there cheaper alternatives to heavy-duty lumber for raised beds?
Use:
- Cinder blocks or bricks (stacked with landscape fabric underneath for stability).
- Reclaimed wood (check for chemical treatments—avoid pressure-treated if growing edibles).
- Straw bales (temporary, biodegradable option for short-term beds).
- Galvanized metal edging (durable and lightweight).
Just ensure whatever you choose resists rot and provides enough weight to stay put on slopes.
How do I keep soil from washing out after heavy rain?
Prevent erosion with these tricks:
- Add a 1–2 inch gravel layer at the bottom of your bed for drainage.
- Install landscape fabric between soil and gravel to filter runoff.
- Plant ground covers (like clover or creeping thyme) along the bed’s edges.
- Create a berm (small ridge) downslope to slow water flow.
For steep slopes, swales (shallow trenches) can redirect water away from your beds.
What if my slope is rocky—can I still build raised beds?
Rocky slopes are manageable! Clear large rocks (use them for edging or retaining walls), but leave smaller ones in the soil—they improve drainage. If rocks are too abundant, consider:
- Building shallow beds (6–8 inches deep) to avoid digging.
- Using container gardening in gaps between rocks.
- Layering cardboard and compost over rocks to create soil over time.
Rocks can even help stabilize your beds on slopes if placed strategically!
Wrapping up and next steps
Building a raised bed on a slope doesn’t have to be a challenge—with the right techniques, you can create a stable, beautiful, and functional garden that works with nature, not against it. 🌱 Whether you’ve chosen terracing, contouring, or a combination of both, your efforts will reward you with easier planting, better drainage, and a thriving garden that even the steepest incline can’t stop.
Now that you’re ready to roll up your sleeves, start small—pick one section of your slope, gather your tools, and begin! Before you know it, you’ll be harvesting fresh veggies or admiring your flourishing flowers, all thanks to your well-built raised beds. Happy gardening! 🌿