
Tools
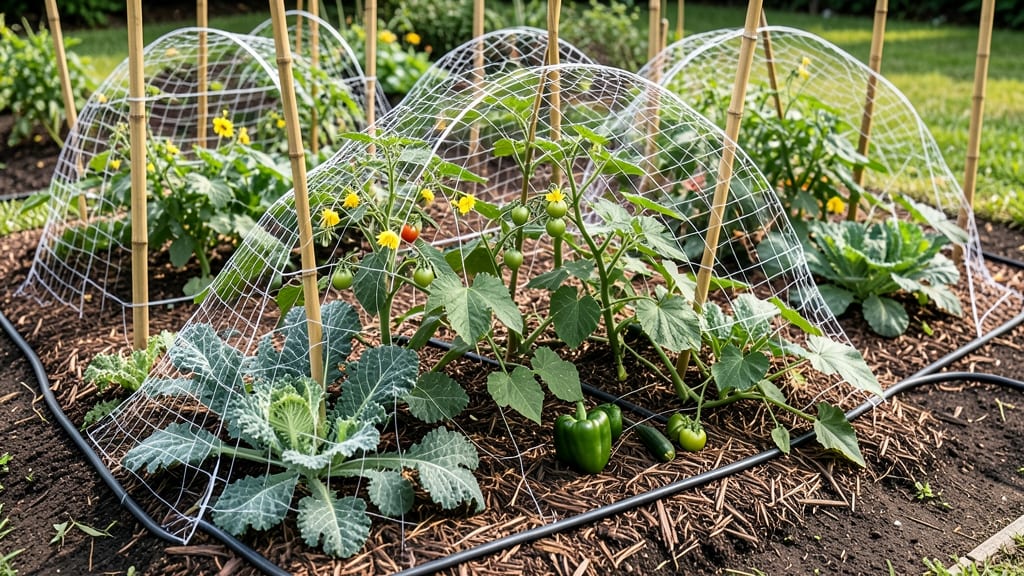
Garden bed nets saved my tomatoes last summer when a flock of birds turned my thriving plants into a buffet. 🌱 These lightweight barriers keep pests out while letting sunlight, water, and air flow right through—no more stressed plants or ruined harvests.
You’ll find nets in different mesh sizes: 1/4-inch for insects, 1/2-inch for birds, and 1-inch for larger critters like deer. Heavy-duty polyester lasts years, while lighter options work for short seasons. Just measure your beds and choose a size that fits snugly without smothering your plants.
Installation takes 10 minutes: drape the net over hoops or stakes before planting, secure with clips or weights, and tuck edges into soil. The result? Stress-free growing—no more frantic chasing off pests midday. They’re reusable, easy to clean, and won’t affect plant growth.
Just store them dry when not in use, and you’re ready for next season’s protection. Worth every penny for the peace of mind!
📚 In This Guide
- What you need
- Instructions
- Tips and common mistakes
- Wrapping up and next steps
What you need
- ● Garden bed nets: Lightweight, breathable mesh (16–20 gauge, 50–70% shade cloth for optimal airflow). Size: Match your garden bed dimensions (e.g., 4’x8’ net for standard raised beds). Durable UV-resistant material (polyethylene or polypropylene) for longevity.
- ● Support frames: PVC pipes (½" diameter, 4–6 pieces per bed) or metal hoops (galvanized for rust resistance). T-posts or stakes (6"–12" long, 1 every 2–3 feet) for anchoring.
- ● Fasteners: Zippers, clips, or Velcro straps (2–4 per net) for easy removal. Heavy-duty staples or garden stapler for securing nets to frames.
- ● Measuring tape & scissors (for custom cuts).
- ● Work gloves (to handle prickly supports or sharp edges).
- ● Weather-resistant tape (to reinforce seams or edges).
- ● Adjustable clips (for nets that need frequent removal).
- ● Reflective tape (to deter birds or small mammals).
- ● Portable fabric weights (to secure nets in windy conditions).
- ● Extra net panels (for larger gardens or overlapping sections).
How to install garden bed nets for maximum pest protection
Here’s the straightforward method I’ve used for years to keep pests off my veggies without chemicals.
🪴 Step 1: Measure and Select the Right Net Size
Start by measuring your garden bed’s length and width. Add 6 inches to each dimension to ensure the net drapes fully over the edges without gaps. For example, a 4-foot by 8-foot bed needs a net at least 4.5 feet by 8.5 feet. Standard nets come in 4x8, 5x10, or 6x12-foot sizes, so adjust accordingly.
Check the mesh size—1/4-inch to 1/2-inch holes block most pests while allowing airflow and sunlight through. Larger holes let in bigger insects like tomato hornworms, while smaller holes may trap too much humidity. I always opt for 1/2-inch mesh for a balance between protection and ventilation.
🌿 Step 2: Prepare the Garden Bed for Net Installation
Clear the bed of any debris or weeds before installing the net. If your plants are already growing, gently tuck them into the bed’s edges to avoid damaging stems. For new plantings, arrange seedlings or seeds in their final positions before covering.
Use bamboo stakes or heavy-duty fabric clips to secure the net. Drive stakes into the ground at each corner of the bed and along the center of long sides—about every 3 feet—to create a sturdy frame. This prevents the net from sagging or shifting when wind blows. If your bed has a low border, add extra stakes to keep the net taut.
💧 Step 3: Drape and Secure the Net Properly
Lay the net over the bed, ensuring it covers the entire area evenly. Smooth out any wrinkles or bunches, as these can create gaps where pests might sneak in. For extra security, tuck the edges under the soil slightly or weigh them down with small rocks along the perimeter.
Attach the net to the stakes using fabric clips, zip ties, or twist ties. Avoid metal staples—they can tear the mesh over time. Leave a 2-inch overhang at the top edges to create a loose flap that can be lifted for quick access. This makes it easy to check plants or add water without fully removing the net.
✂️ Step 4: Maintain and Adjust the Net Seasonally
Check the net weekly for tears or holes, especially after storms. Repair small rips with clear tape or mesh patches designed for garden use. If the net becomes dirty or clogged with debris, gently brush it off or rinse with water—never use harsh chemicals, as residue can harm plants.
Adjust the net as your plants grow. If vines or tall stems brush against the mesh, secure them to the stakes with soft plant ties to prevent damage. In late summer, loosen the net slightly if humidity builds up inside—condensation can invite fungal issues. Store unused nets in a dry place to prevent mildew.
☀️ Step 5: Monitor for Pest Activity and Net Effectiveness
Watch for signs of pests like chewed leaves or missing fruits. If you spot any, lift the net and inspect the underside—pests often gather there. A well-installed net should keep aphids, cabbage worms, and even rabbits out, but occasional intruders (like thrips) might still slip through.
Rotate the net’s position if you notice plants leaning toward one side—a sign they’re not getting even light. Every 2-3 weeks, give the bed a quick shake to dislodge any debris or pests hiding in the mesh. This keeps your harvest lush and stress-free, just like the promise of a pest-proof garden.
Tips & tricks for perfect garden bed net installation
These simple strategies will help you get the most out of your pest protection system—without the common headaches.
Mesh Size Matters: While the instructions recommend 1/2-inch mesh for most garden beds, I've found that 1/4-inch mesh works better for delicate crops like lettuce or herbs—it blocks even the tiniest pests while still allowing plenty of airflow. For larger plants like tomatoes or squash, the 1/2-inch mesh gives them room to grow without restricting airflow. Just remember that smaller holes mean less light penetration, so monitor your plants closely for any signs of stress.
Stake Placement Pro Tip: In Step 2, when you're driving stakes every 3 feet, add an extra stake at the midpoint of each long side—especially if you have a windy garden. I learned this the hard way when a summer storm blew my net right off a 10-foot bed! The extra support prevents sagging and keeps the net taut, which is crucial for blocking pests. For rectangular beds, use 4 corner stakes plus 2 center stakes per long side for maximum stability.
Seasonal Adjustments: The instructions mention adjusting the net in late summer for humidity, but I also recommend checking it in early spring. If you're in a region with heavy morning dew, leave the net slightly loose during damp periods to prevent condensation buildup. You can also add small ventilation holes (about 1-inch diameter) near the top edges if you notice excessive moisture inside. This simple trick prevents fungal issues while still keeping pests out.
Repair Strategy: When you check the net weekly for tears, keep a small kit handy with clear mesh repair tape and a pair of scissors. I always cut out any damaged areas and patch them immediately—even small holes can let in pests. For larger tears, you can use heavy-duty fabric glue designed for outdoor use. Store your repair supplies in a zip-top bag tied to one of your garden stakes so they're always accessible when you need them.
Pro Tips for Garden Bed Nets
- These simple strategies will help you get the most out of your pest protection system—without the common headaches.
- Mesh Size Matters: While the instructions recommend 1/2-inch mesh for most garden beds, I've found that 1/4-inch mesh...
- Stake Placement Pro Tip: In Step 2, when you're driving stakes every 3 feet, add an extra stake at the midpoint of ea...
Frequently asked questions
Got questions about garden bed nets?
You’re not alone—here are the answers to the most common ones to help you make the best choice for your garden!
When is the best time to install garden bed nets?
Install nets before pests arrive—typically in early spring when plants are young or just after transplanting. For seasonal pests (like moths or beetles), set them up 2–4 weeks before the expected infestation. Check local pest cycles to time it perfectly!
Will bed nets block too much sunlight or airflow?
Not if you choose the right mesh! Most high-quality nets (like 50–70% shade cloth) allow 60–80% sunlight through while keeping pests out. Opt for breathable, UV-stabilized materials to prevent overheating or stunted growth.
Can I reuse garden bed nets year after year?
With proper care, nets can last 5–10+ years. Store them in a dry, shaded spot (folded or rolled) to prevent mildew. Give them a quick rinse with soapy water if they get dirty—just avoid harsh chemicals that degrade the fabric.
Are there cheaper alternatives to bed nets?
Yes! For small gardens, try row covers (lighter fabric) or floating row covers (temporary, reusable). DIY options include chicken wire + fine mesh or old window screens, but these may offer less durability or pest protection.
What should I do if pests still get through?
First, check for gaps or tears in the net—repair with duct tape or stitching. If pests persist, try companion planting (e.g., marigolds to deter beetles) or neem oil sprays as a backup. Rotate net placement yearly to disrupt pest patterns!
How do I know what size net to buy?
Measure your garden bed’s length × width and add 1–2 feet for overlap. For tall plants (like tomatoes), choose a net with a height of at least 3–4 feet. Pro tip: Custom-cut nets save money over pre-sized options!
Wrapping up and next steps
Garden bed nets are your secret weapon for a thriving, low-maintenance garden—keeping pests at bay while letting your plants soak up sunshine and nutrients. Whether you're a seasoned gardener or just starting, these simple tools save time, reduce stress, and protect your hard work from hungry critters. 🌱
Ready to take the next step? Start small—try a net over your most vulnerable plants or a raised bed, then expand as you see results. Your future self (and your veggies!) will thank you.