
Tools
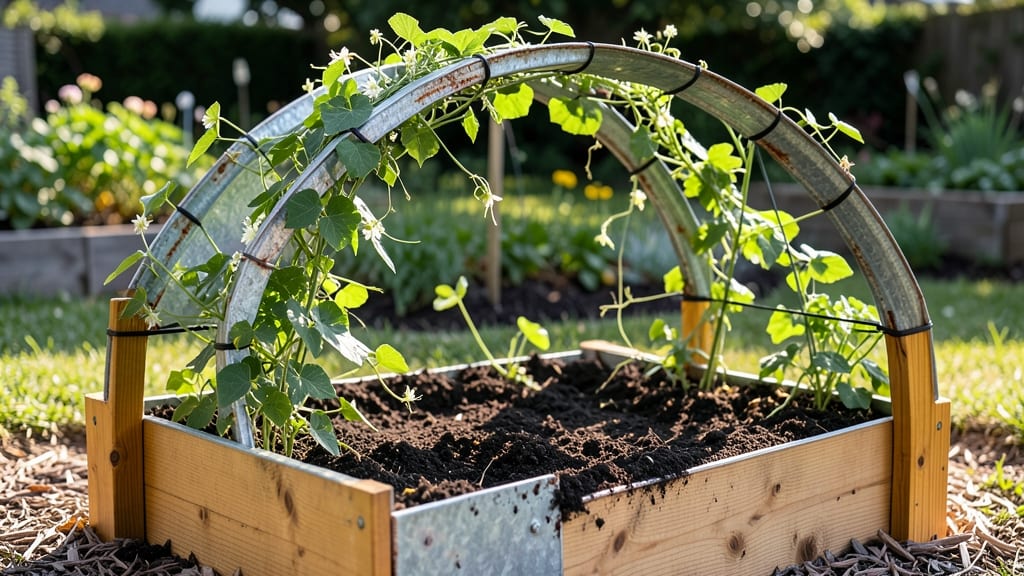
A raised garden bed with cattle panel arch transforms your space into a dreamy trellis that climbs with vines and flowers. 🌿 I built mine last spring after watching my cucumbers sprawl across the lawn—now they grow vertically, saving space and looking like a lush green tunnel.
The arch is sturdy, weatherproof, and takes less than 2 hours to assemble with basic tools.
The beauty of cattle panel arches is their versatility—they work for tomatoes, peas, morning glories, or even decorative climbing roses. You can build them 3-6 feet tall depending on your plants, and the galvanized steel resists rust for years.
Plus, they blend seamlessly into any garden style, from rustic to modern.
By summer, your raised bed will be a vertical jungle of edible and ornamental plants, all supported without a single stake. The arch also makes harvesting easier—no more bending over for those high-hanging tomatoes.
We’ll cover exact measurements, tools, and how to secure the panels so they last through wind and rain.
Perfect for small spaces, urban gardens, or anyone who wants to maximize growing area without sacrificing aesthetics. Let’s get those panels cut and your garden climbing!
📚 In This Guide
- What you need
- Instructions
- Tips and common mistakes
- Wrapping up and next steps
What you need
- ● Cattle panels (arch frame): 1–2 panels (48"–60" wide, depending on bed size). Look for heavy-duty, galvanized steel (16–18 gauge).
- ○ Optional: Pre-bent arch panels (saves time!) or straight panels to bend yourself.
- ● Lumber for raised bed: Pressure-treated or cedar boards (2x6 or 2x8, untreated if using food-safe wood).
- ● Quantity: ~8–12 boards (cut to 4’–8’ lengths, depending on bed dimensions).
- ● Hardware: Deck screws (2.5"–3", stainless steel or galvanized) – ~50–100 screws.
- ● U-bolts or heavy-duty zip ties (to secure arch to bed frame).
- ○ Optional: Corner braces for extra stability.
- ● Soil & amendments: High-quality gardening soil (2–3 cubic feet per square foot of bed).
- ○ Optional: Compost, perlite, or vermiculite for drainage.
- ● Circular saw or handsaw (for cutting lumber).
- ● Drill/driver (with screw attachment).
- ● Measuring tape, speed square, and pencil.
- ● Work gloves and safety glasses.
- ○ Optional: Level, staple gun (for landscape fabric), or post hole digger (if anchoring to ground).
- ● Flat, level ground (or a patio/deck if elevating).
- ● Clear workspace (at least 6’x6’ for assembly).
- ● Basic DIY skills (or a friend to help with heavy lifting!).
- ○ Optional: Landscape fabric (to line the bed and block weeds).
Step-by-step instructions for building a raised garden bed with cattle panel arches
Here's how to create a sturdy, long-lasting garden structure that supports climbing plants while keeping soil contained.
🪴 Step 1: Assemble the Raised Garden Bed Frame
Start by laying out your 4×8-foot cedar planks (2×6 or 2×8 works best) to form a rectangular frame. Use 3-inch deck screws to attach the corners, pre-drilling holes to prevent splitting. I like to leave a 1-inch gap between the ends of adjoining planks for drainage and root expansion. This simple frame will hold your soil and support the arches later.
For extra stability, add a 2×4 cross brace every 2 feet along the length of the bed. This prevents the frame from bowing under soil weight. Test the frame by gently pressing down—it should hold its shape without wobbling. If it feels unstable, add more cross braces or use thicker lumber.
☀️ Step 2: Install the Cattle Panel Arches
Cut your cattle panels into 3-foot lengths using heavy-duty tin snips or a reciprocating saw. Bend each panel into a gentle arch shape—think of a half-circle with a 12-inch base width at the bottom. Secure the ends temporarily with zip ties while you position them evenly along the bed's length, about 3 feet apart. This spacing ensures vines have room to grow without overcrowding.
Once positioned, permanently attach the arches to the frame using stainless steel U-bolts and 1-inch lag bolts. I drill pilot holes first to avoid cracking the wood. The arches should sit just below the top edge of the bed so climbing plants can easily wrap around them. Double-check that each arch is level—uneven arches will cause vines to grow crooked.
💧 Step 3: Add Soil and Plant Support Layers
Fill the bed with a mix of 6 inches of coarse gravel at the bottom for drainage, followed by 12 inches of quality garden soil. I like to blend in compost and aged manure for nutrient-rich growing conditions. Leave about 2 inches of space between the soil surface and the top of the frame to accommodate mulch and watering.
Before planting, wrap the arches with jute twine or landscape fabric to prevent soil from sifting through the panel gaps. This also gives vines something to grip as they climb. For heavy climbers like beans or cucumbers, add a lightweight trellis netting inside the arches to distribute weight evenly. Water the soil thoroughly before planting to settle it.
🌿 Step 4: Plant and Train Climbing Plants
Choose plants that thrive on vertical support, like pole beans, cucumbers, or morning glories. Plant seeds or seedlings at the base of each arch, spacing them 6-12 inches apart depending on the plant's mature size. Water gently after planting to encourage root establishment. You'll see new growth within 7-14 days, signaling it's time to start guiding the vines.
As plants grow, gently weave the tendrils around the arches and twine. Avoid forcing vines—let them climb naturally to prevent breakage. For aggressive growers like squash, use soft ties to secure the main stems to the arches. Prune any side shoots that aren't climbing to focus energy upward. By mid-summer, your arches will be covered in lush foliage and blooms.
✂️ Step 5: Maintain and Extend the Season
Throughout the growing season, monitor the arches for rust or loose bolts. Tighten any U-bolts and touch up rust spots with a metal primer to extend their lifespan. In fall, remove spent plants and add a 2-inch layer of mulch to protect the soil and arches from winter weather. This simple step keeps your bed ready for spring planting with minimal effort.
For year-round use, consider adding a clear plastic tunnel over the arches in early spring or late fall. This extends the growing season by 4-6 weeks on either end. Just secure the plastic with stakes and remove it during warm days to prevent overheating. Your arches will support plants through multiple seasons with proper care.
Tips & tricks for building a sturdy raised garden bed with cattle panel arches
Here's what I've learned from years of building these garden structures—small details that make all the difference.
Precision Cutting: When cutting cattle panels into 3-foot lengths, use a straight edge and a sharp reciprocating saw to ensure clean, even cuts. Uneven cuts will make the arches wobbly and uneven, which can stress your climbing plants. I mark my measurements with a tape measure and a pencil before cutting to avoid mistakes—especially important when working with multiple panels.
Leveling Matters: Before permanently attaching the arches, use a level to ensure each one sits perfectly straight. Uneven arches will cause vines to grow crookedly, making harvesting difficult and potentially damaging delicate stems. I place a level along the length of each arch before tightening the U-bolts—this takes just a few extra minutes but prevents frustration later.
Soil Layering Strategy: The 6-inch gravel layer at the bottom isn't just for drainage—it also helps prevent soil from spilling through the cattle panel gaps. I like to add a layer of landscape fabric over the gravel before adding soil to create an extra barrier. This keeps everything contained while still allowing water to drain properly.
Plant Selection Insight: For maximum success with your arches, choose plants that naturally climb rather than sprawl. Pole beans, cucumbers, and morning glories are ideal because they'll wrap around the arches without needing constant support. I avoid heavy vines like pumpkins unless I add extra trellis netting inside the arches to distribute weight evenly.
Pro Tips for Raised Garden Bed With Cattle Panel Arch
- Here's what I've learned from years of building these garden structures—small details that make all the difference.
- Precision Cutting: When cutting cattle panels into 3-foot lengths, use a straight edge and a sharp reciprocating saw ...
- Leveling Matters: Before permanently attaching the arches, use a level to ensure each one sits perfectly straight. Un...
Frequently asked questions
Got questions about building or using a raised garden bed with cattle panel arch? You’re not alone! Here are some of the most common concerns—and straightforward answers—to help you get started with confidence.
How long does it take to assemble a cattle panel arch for a raised bed?
A basic arch typically takes 1–2 hours for one person, depending on the size and tools used. If you’re working with a helper, you can cut that time in half! Pre-cutting the panels and stakes ahead of time saves extra steps. For larger beds (like 4’x8’), plan for 2–3 hours to ensure stability and precision.
Can I use cattle panels for arches without bending them first?
Yes, but it requires extra support. If you skip bending, use vertical stakes every 2–3 feet along the panel’s length to hold it in place. For a semi-permanent arch, consider pre-bending the panels with a pipe bender or by carefully heating them (with safety gear!) for a cleaner, stronger curve.
What’s the best time of year to install a cattle panel arch?
Spring or early fall are ideal—before extreme heat or frost—when soil is workable and plants are easier to establish. If you’re in a mild climate, you can install arches year-round, but avoid freezing temps, which can make bending panels tricky. Pro tip: Install arches before planting to give roots time to anchor into the soil.
How do I keep pests out of my raised bed with an arch?
Cattle panel arches act as a physical barrier, but gaps can still let in pests. Use hardware cloth (1/4” mesh) to cover any openings, and secure it tightly. For added defense, interplant with pest-repelling herbs like basil or marigolds. Elevate the bed slightly (if possible) to deter burrowing critters like rabbits or voles.
Are there cheaper alternatives to cattle panels for arches?
Consider:
- PVC pipes (cut and bent into arches, then wrapped with wire)
- Reclaimed wood (sanded and shaped into hoops)
- Bamboo stakes (for smaller beds, though less durable long-term)
Wrapping up and next steps
A raised garden bed with a cattle panel arch isn’t just a clever DIY project—it’s a game-changer for year-round gardening! 🌱 These sturdy, rustic arches provide unmatched support for climbing plants, extend your growing season, and add a charming, functional touch to your space.
Whether you’re a seasoned gardener or just starting out, this project proves that durability meets creativity with minimal effort.
Ready to transform your garden? Grab your tools, gather your materials, and start building! Your future vines, tomatoes, and cucumbers will thank you—plus, you’ll have a stunning centerpiece that’s as practical as it is pretty. 🌿✨