
Tools
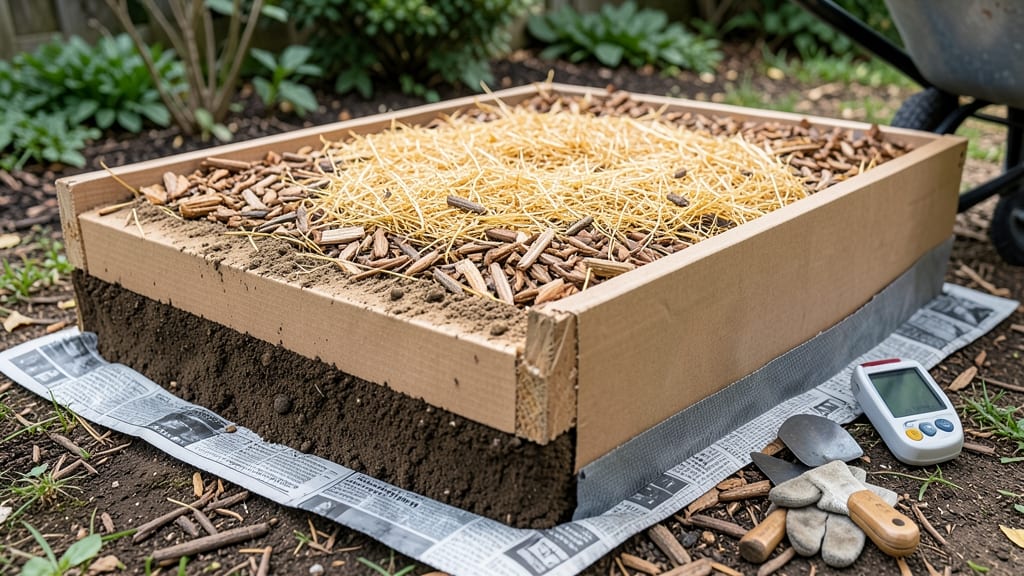
My raised garden bed fill layers are the secret to the lushest harvests I’ve ever grown—no expensive soil blends required. 🌱 The right stack of materials creates a thriving ecosystem where roots spread freely, water drains properly, and nutrients stay available all season long.
I learned the hard way that cheap fill dirt or compost alone won’t cut it; your plants need a balanced foundation to reach their full potential.
Start with a 4-inch layer of coarse material—like broken branches or wood chips—at the bottom for drainage. Then add 2 inches of hardware cloth to block weeds and burrowing critters. Above that, mix equal parts compost, aged manure, and garden soil to create a fertile growing medium.
This isn’t just guesswork; it’s a science-backed approach that keeps roots happy and plants productive from day one.
Once filled, your bed will stay moisture-retentive without drowning roots, and the organic matter will feed plants for years. The texture stays loose enough for easy root penetration while holding nutrients like a sponge.
You’ll notice stronger stems, bigger flowers, and fewer pests—because healthy soil means healthy plants. This method works for vegetables, herbs, and even flowers, no matter your space.
Pro tip: Top off with 1-2 inches of mulch after planting to lock in moisture and suppress weeds. Over time, the bed will break down naturally, so refresh the top layer each spring. Trust me, once you go this route, you’ll never go back to generic bagged soil again.
📚 In This Guide
- What you need
- Instructions
- Tips and common mistakes
- Wrapping up and next steps
What you need
- ● Cardboard or landscape fabric (1-2 sheets, 3-4 ft wide) – Acts as a weed barrier and prevents soil erosion.
- ● Coarse wood chips or straw (2-3 inches thick) – Improves drainage and breaks down over time.
- ● Compost (3-4 inches thick) – Adds organic matter and nutrients. Use well-aged compost (avoid fresh manure).
- ● Topsoil or garden soil (4-6 inches thick) – Provides a stable base for planting.
- ○ Peat moss or coconut coir (optional but recommended for moisture retention, 2-3 inches).
- ● Slow-release organic fertilizer (e.g., composted manure, worm castings, or balanced granular fertilizer).
- ● Garden gloves – Protects your hands from dirt and sharp edges.
- ● Shovel or spade – For digging and layering materials.
- ● Rake or hoe – Helps level and mix layers evenly.
- ● Wheelbarrow or large bucket – For hauling materials (aim for at least 2-3 cubic feet of capacity).
- ● Measuring tape – Ensures even layer distribution.
- ● Watering can or hose with spray nozzle – Keeps layers moist during assembly.
- ● Biochar or perlite – Improves aeration and water retention (mix into top layers).
- ● Mulch (straw, wood chips, or leaves) – Retains moisture and suppresses weeds.
- ● pH testing kit – Adjust soil acidity if needed (aim for 6.0-7.0 for most veggies).
- ● Drip irrigation kit – Automates watering for consistent moisture.
Step-by-Step guide to building a science-backed raised garden bed
Here's how to layer your bed for maximum root growth and nutrient retention.
🪴 Step 1: Start With a Sturdy Base Layer
Lay down 4-6 inches of coarse gravel or broken bricks at the bottom of your raised bed. This creates essential drainage while keeping roots from sitting in soggy soil. I like to use clean, sharp-edged gravel because it prevents compaction over time—flat stones can create air pockets that roots avoid.
Spread the drainage layer evenly across the entire bed bottom. You'll notice the bed feels lighter and more stable afterward, which matters if you plan to walk on it. For heavier clay soils, add an extra inch of gravel to prevent waterlogging during heavy rains.
🌱 Step 2: Add Carbon-Rich Materials for Structure
Next, layer in 4-6 inches of carbon sources like untreated hardwood chips, straw, or shredded newspaper. These materials improve soil aeration while breaking down slowly to feed beneficial microbes. I prefer hardwood chips because they resist decomposition too quickly—unlike fresh wood shavings, which can rob nitrogen from your soil.
Spread this layer evenly and lightly tamp it down with your hands. You want it loose enough for roots to penetrate but firm enough to support the upper layers. This is where the "lasagna method" really shines—each layer builds on the previous one to create a living ecosystem.
💧 Step 3: Introduce Nitrogen-Rich Materials
Now add 2-4 inches of nitrogen sources like composted manure, leaf mold, or well-aged compost. These materials balance the carbon layer and provide immediate nutrients for your plants. I always use a mix of cow manure and finished compost because the manure adds bulk while the compost provides balanced nutrition.
Mix this layer gently with your hands to integrate it with the carbon layer below. You'll see the materials darken and feel richer—this is your soil's foundation for nutrient storage. Avoid fresh manure here; it can burn young roots and create too much heat during decomposition.
☀️ Step 4: Top With Finished Compost and Planting Soil
Finish with 4-6 inches of high-quality potting soil or garden soil mixed with additional compost. This top layer should be loose and crumbly, perfect for seed germination and root establishment. I like to sift the soil to remove large clumps—roots need easy access to air and water, not obstacles.
Spread this final layer evenly, creating a smooth surface for planting. Water lightly after filling to help settle everything without compacting. The top inch should feel moist but not soggy—this ensures your plants get a strong start without the risk of waterlogged roots.
✂️ Step 5: Mulch and Plant for Long-Term Success
Apply 2-3 inches of organic mulch like straw or wood chips to the surface. This protects your soil from erosion, retains moisture, and regulates temperature. I prefer straw because it breaks down slowly while suppressing weeds effectively. Keep the mulch 2 inches away from plant stems to prevent rot.
Now your bed is ready for planting! The layered structure ensures proper drainage while retaining moisture and nutrients exactly where roots need them. You'll see healthier plants with fewer pests and better yields—all because the soil works with your plants, not against them.
Tips & tricks for perfect raised garden bed layers
Building the ideal raised bed isn't just about throwing dirt in a box - these small details make all the difference for thriving plants.
Drainage Layer Depth: In Step 1, those 4-6 inches of gravel aren't just for show—they should feel like a proper foundation. I like to check depth by pressing my hand into the gravel; if it feels too shallow, add another inch. This prevents water from pooling at the bottom where roots can't reach, especially in clay-heavy soils where drainage is critical. For extra insurance, consider adding a landscape fabric layer between the gravel and carbon materials to prevent fine particles from clogging your drainage system over time.
Carbon-Nitrogen Balance: When mixing your 2-4 inches of nitrogen sources in Step 3, think of it as creating a perfect sandwich. The carbon layer (Step 2) should be about 1.5 to 2 times the volume of your nitrogen layer. Too much nitrogen without carbon creates a "hot spot" that burns roots, while too much carbon without nitrogen leaves your soil hungry. I always do a quick visual check: the mix should look dark brown with just a hint of the lighter carbon materials peeking through.
Soil Texture Test: Before planting, run this simple test on your top 4-6 inches of soil mix: grab a handful and squeeze gently. It should hold its shape when pressed but crumble easily when you poke it. If it stays in a tight ball, add more carbon materials; if it falls apart completely, you need more nitrogen. This texture ensures both water retention and aeration—two things roots absolutely need to thrive in raised beds.
Mulch Placement: That 2-3 inches of mulch in Step 5 deserves special attention. Spread it evenly but keep it 2 inches away from plant stems to prevent rot. I've found that creating small "mulch donuts" around each plant—leaving the center bare—gives stems room to breathe while still protecting the soil. For heavy rain areas, consider adding a thicker layer (up to 4 inches) of mulch to prevent erosion from washing away your precious topsoil.
Pro Tips for Raised Garden Bed Fill Layers
- Building the ideal raised bed isn't just about throwing dirt in a box - these small details make all the difference f...
- Drainage Layer Depth: In Step 1, those 4-6 inches of gravel aren't just for show—they should feel like a proper found...
- Carbon-Nitrogen Balance: When mixing your 2-4 inches of nitrogen sources in Step 3, think of it as creating a perfect...
Frequently asked questions
Got questions about building the perfect raised garden bed? You’re not alone!
Here are answers to the most common concerns—so you can skip the guesswork and get planting with confidence.
What’s the cheapest way to fill a raised garden bed?
Mix free or low-cost materials like straw, leaves, or grass clippings (as carbon-rich "browns") with composted manure or kitchen scraps (as nitrogen-rich "greens"). Avoid expensive store-bought soil—focus on breaking down organic matter over time. Check our layering guide for a budget-friendly breakdown!
How long does it take for the layers to decompose?
With the right balance of "greens" and "browns," decomposition typically takes 3–6 months for coarse materials (like wood chips) and 2–4 weeks for finer layers (like compost). Speed it up by adding worm castings or a thin topsoil layer—your plants will thank you!
Can I use grass clippings directly in my raised bed?
Not fresh! Grass clippings mat when wet and create a nitrogen-heavy (but anaerobic) mess. Instead, dry them first (2–3 days in a pile) or mix them with equal parts browns (like straw) to balance nutrients. Pro tip: Chop and drop them thinly for better airflow.
What if my bed smells bad after filling it?
A foul odor usually means too much nitrogen (like fresh manure) or not enough oxygen (compacted layers). Fix it by:
- Fluffing the layers with a fork to improve airflow.
- Adding coarse materials (straw, wood chips) to balance moisture.
- Topping with 1–2 inches of finished compost to stabilize smells.
Can I reuse old raised bed soil?
Save and reuse
your existing soil by:
- Sifting out debris (rocks, roots).
- Mixing in 20–30% fresh compost to replenish nutrients.
- Avoiding contaminated soil (e.g., from diseased plants).
Wrapping up and next steps
Building the perfect raised garden bed fill layers is your secret weapon for a thriving, bountiful harvest! By stacking materials like cardboard, compost, and soil, you’re not just gardening—you’re creating a science-backed ecosystem that nurtures roots, retains moisture, and boosts plant growth. 🌱
Now that you’re armed with the knowledge, it’s time to roll up your sleeves and get growing! Start small with one bed, experiment with your layers, and watch your garden transform into a lush, productive paradise. Happy planting! 🌿