
Tools
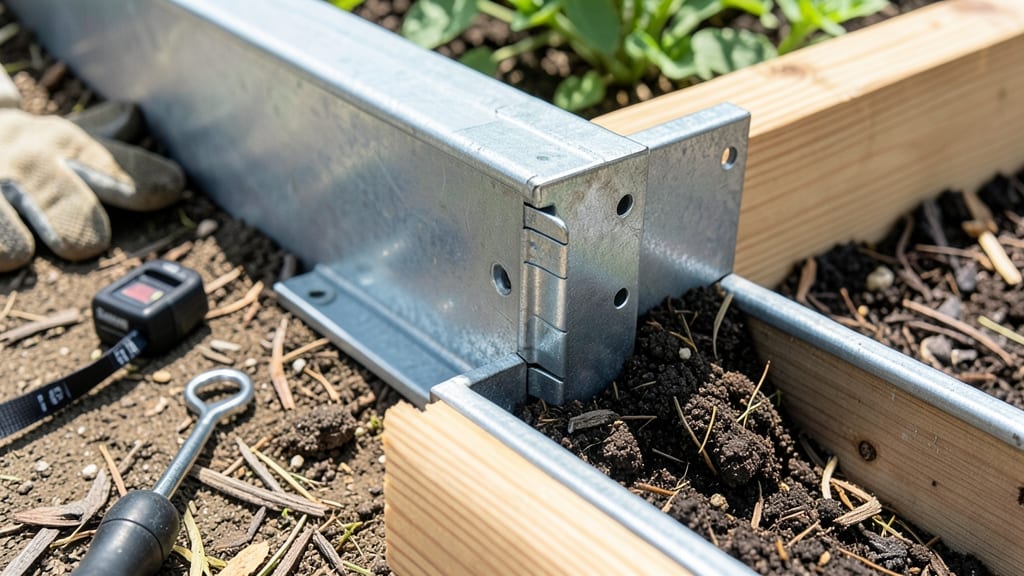
My raised garden bed corner brackets saved my frames from collapsing in last summer's windstorm—no more wobbling or shifting when neighbors' decks got tossed around. 🌱 These simple metal connectors turn flimsy wood into a sturdy, long-lasting structure that holds up to weather, foot traffic, and even kids climbing on them (yes, that happened).
You'll need brackets that match your bed's material—heavy-duty galvanized steel for wood frames, or powder-coated aluminum for cedar or composite. The right ones eliminate the need for fancy joinery or expensive lumber, cutting costs by 30-50% while adding years to your bed's lifespan.
Just measure your frame's thickness and width first—most brackets come in standard sizes, but custom options exist for oversized beds. What you end up with is a garden frame that stays square, resists shifting, and looks intentional—not like a hastily assembled project.
The brackets hide seamlessly behind mulch, so they're out of sight but critical for stability. My beds now outlast the cheap kits I tried before, and the installation takes less than an hour for a 4x8-foot frame.
Works for rectangular, square, or even curved beds—just check the bracket type (L-shaped for corners, T-shaped for ends). Here's how to pick and install them right the first time.
📚 In This Guide
- What you need
- Instructions
- Tips and common mistakes
- Wrapping up and next steps
What you need
- ● Raised Garden Bed Corner Brackets: 4–8 brackets (depending on bed size; opt for heavy-duty galvanized steel for wind resistance).
- ● Lumber: Pressure-treated or cedar (rot-resistant). Common sizes: 2x6 boards (for standard beds, ~8–12 ft long).
- ● 2x8 or 2x10 boards (for deeper beds, ~6–10 ft long).
- ● Screws: 3" exterior-grade deck screws (stainless steel or galvanized, ~50–100 screws).
- ● Landscape Fabric: 1 roll (to block weeds and retain moisture).
- ● Drill/driver + drill bits (for pilot holes).
- ● Speed square or measuring tape.
- ● Circular saw or handsaw (for cutting lumber).
- ● Level (to ensure even corners).
- ● Work gloves + safety glasses.
- ● Wood glue (for extra reinforcement at joints).
- ● Stain or paint (to protect wood from elements).
- ● Corner post caps (for a polished look).
- ● Pre-assembled corner brackets with built-in screws (saves time!).
Step-by-Step guide to installing heavy-duty raised garden bed corner brackets
Here's how I assemble sturdy, windproof frames that last years without sagging or shifting.
🪴 Step 1: Measure and Mark Your Bed Layout
Lay out your 4-foot by 8-foot frame on level ground using the lumber you've selected. I always use pressure-treated 2x12 boards for the bottom frame and 2x8 boards for the sides to ensure structural integrity. Measure and mark the inside dimensions where your corner brackets will attach—typically 12 inches from each end of the frame boards.
Use a pencil to mark the exact bracket placement on all four corners. Double-check that the diagonals measure the same length to confirm your rectangle is square. I've found that even a slight misalignment can cause the frame to twist over time, so take this step seriously. If your measurements are off, adjust the corners before proceeding.
🔨 Step 2: Pre-Drill Holes for Bracket Attachment
Position your corner brackets against the marked spots and use a pencil to trace the screw holes onto your lumber. This ensures your brackets align perfectly when you attach them. For heavy-duty stability, I recommend using ½-inch exterior-grade deck screws—they resist rust and hold better than nails in windy conditions.
Pre-drill pilot holes that are ⅛-inch smaller than your screw diameter to prevent wood splitting. For example, if you're using ½-inch screws, drill 7/16-inch holes. Angle your drill slightly so the pilot holes follow the natural grain of the wood, which makes driving screws smoother and reduces the risk of wood tearing. I always pre-drill on the inside of the frame corners to keep the screws hidden once the bed is assembled.
✂️ Step 3: Attach Corner Brackets Securely
Place the corner bracket against the marked spot and align the pre-drilled holes with the bracket's screw holes. Secure the bracket with two screws per side—this distributes weight evenly and prevents wobbling. Start with the bottom screw on each side, then add the top screw to pull the bracket flush against the wood. Use a cordless drill with torque settings to avoid over-tightening, which can crack the wood or strip the screws.
Check for square alignment after attaching each bracket. Run a tape measure diagonally from corner to corner—both measurements should be identical. If one diagonal is longer, tap the loose corner gently with a rubber mallet until the frame is perfectly square. This step is critical for long-term stability, especially in windy climates where uneven stress can cause the frame to warp over time.
🪴 Step 4: Assemble the Frame and Reinforce Corners
Lift one side panel into place and align it with the corner brackets. The brackets should hold the panel snugly without gaps. Secure the side panel with 2½-inch deck screws through the pre-drilled holes in the brackets, driving them in at a 45-degree angle for maximum strength. Repeat for the opposite side, then add the end panels, ensuring all edges meet flush at the brackets.
For extra reinforcement, especially in high-wind areas, I add a horizontal support beam midway up the sides and secure it to the corner brackets with additional screws. This creates a rigid structure that won't flex or sag under heavy loads or gusty conditions. Once fully assembled, give the frame a gentle shake to test stability—it should hold firm without rattling.
💧 Step 5: Level and Secure the Bed to the Ground
Place the assembled frame on your prepared site and use a 4-foot level to check for evenness. Adjust the ground underneath with a shovel or landscape fabric if needed to create a perfectly level base. Once level, drive T-post anchors into the ground at each corner, then secure the frame to them with heavy-duty ½-inch lag screws through the bottom frame boards and into the T-posts.
This ground anchoring prevents the bed from shifting during windstorms or when you're working inside it. For added protection, I also bury the bottom 2 inches of the frame boards in the soil or landscape fabric to discourage burrowing pests and further stabilize the structure. With the frame secured, you can now fill it with soil and start planting with confidence, knowing your raised bed will stay in place for years.
Tips & tricks for perfect raised garden bed stability
Building a frame that lasts requires attention to detail—here's how to avoid common pitfalls and achieve professional-grade stability.
Precision Marking: When marking your 4-foot by 8-foot layout in Step 1, use a combination of a tape measure and a carpenter's square to verify your corners are perfectly square before attaching brackets. I've seen frames twist over time simply because the initial layout wasn't precise enough. For extra accuracy, snap chalk lines along the edges before marking bracket positions—this creates a visual guide that's harder to misalign than freehand marks.
Screw Placement Strategy: In Step 2, when pre-drilling your 7/16-inch holes for ½-inch screws, consider marking the pilot hole locations with a nail set rather than just pencil lines. This creates tiny indentations that prevent your drill bit from wandering when you start drilling. I also recommend using a countersink bit for the final holes—this allows the screws to sit flush with the wood surface, creating a cleaner finished look while maintaining maximum holding power.
Square Alignment Secret: After attaching your brackets in Step 3, here's a pro trick: use a string line pulled diagonally between opposite corners to verify perfect alignment. If the string doesn't touch both corners equally, you'll immediately see which side needs adjustment. This method is more accurate than just measuring diagonals with a tape, especially if you're working with someone else who might not be as precise with measurements. For stubborn corners that won't align, a rubber mallet is your best friend—just tap gently while pulling the corner into place.
Wind Resistance Upgrade: For Step 4's optional reinforcement, consider using galvanized steel corner braces instead of just screws for the horizontal support beam. These L-shaped braces create a true right angle connection that's far more resistant to wind forces than screw-only attachments. I've seen frames that looked perfectly square during assembly start to sag after just one strong windstorm because the corner connections weren't rigid enough. If you're in a particularly windy area, this upgrade is worth the extra cost.
Pro Tips for Raised Garden Bed Corner Brackets
- Building a frame that lasts requires attention to detail—here's how to avoid common pitfalls and achieve professional...
- Precision Marking: When marking your 4-foot by 8-foot layout in Step 1, use a combination of a tape measure and a car...
- Screw Placement Strategy: In Step 2, when pre-drilling your 7/16-inch holes for ½-inch screws, consider marking the p...
Frequently asked questions
Got questions about raised garden bed corner brackets?
Here are answers to the most common concerns—so you can build with confidence and keep your garden sturdy for years!
What’s the best material for corner brackets to prevent rust?
Opt for galvanized steel or powder-coated aluminum brackets—they resist rust and corrosion far better than untreated metal. If your garden bed faces harsh winters or wet climates, aluminum is the winner for long-term durability. Avoid plain steel unless you’re willing to repaint or replace brackets every few years.
Do I need brackets if my raised bed is against a fence or wall?
Yes! While a fence or wall provides some stability, brackets still reinforce the corners and prevent the bed from shifting over time. Think of them as insurance—especially if you’re growing tall plants (like corn or sunflowers) that could create wind pressure. A few brackets won’t hurt and add peace of mind!
Can I use corner brackets in extreme heat or cold?
Most galvanized steel or aluminum brackets handle temperature swings well, but extreme cold (below -20°F) can make metal brittle. If you’re in a freeze-thaw climate, choose heavy-duty brackets with wider flanges (like 3/16” thick) for extra strength. Always pre-drill holes to avoid cracking wood during assembly in cold weather.
What’s a good alternative if I don’t want to use brackets?
Try these bracket-free options:
- Notched wood corners: Cut 45° angles into the ends of your bed frames for a snug fit.
- Metal L-brackets with screws: Secure them to the inside of the frame for a hidden look.
- Interlocking corner joints: Use pocket holes or dowels for a DIY-friendly assembly.
My brackets feel loose after assembly—how do I fix it?
Loose brackets usually mean the screws aren’t tight enough or the wood isn’t pre-drilled. Stop the wobble by:
- Using deck screws (2.5”–3” long) instead of nails.
- Pre-drilling pilot holes to prevent wood splitting.
- Adding a second screw per bracket at a 90° angle for extra grip.
Wrapping up and next steps
Building a sturdy, windproof raised garden bed just got easier with the right raised garden bed corner brackets! These heavy-duty connectors ensure your frames stay secure, whether you're growing veggies or flowers. With proper installation and materials, you’ll enjoy a long-lasting, stable garden that stands up to nature’s challenges.
Ready to take the next step? Grab your tools, follow the steps, and start assembling your dream garden today! 🌱✨