
Tools
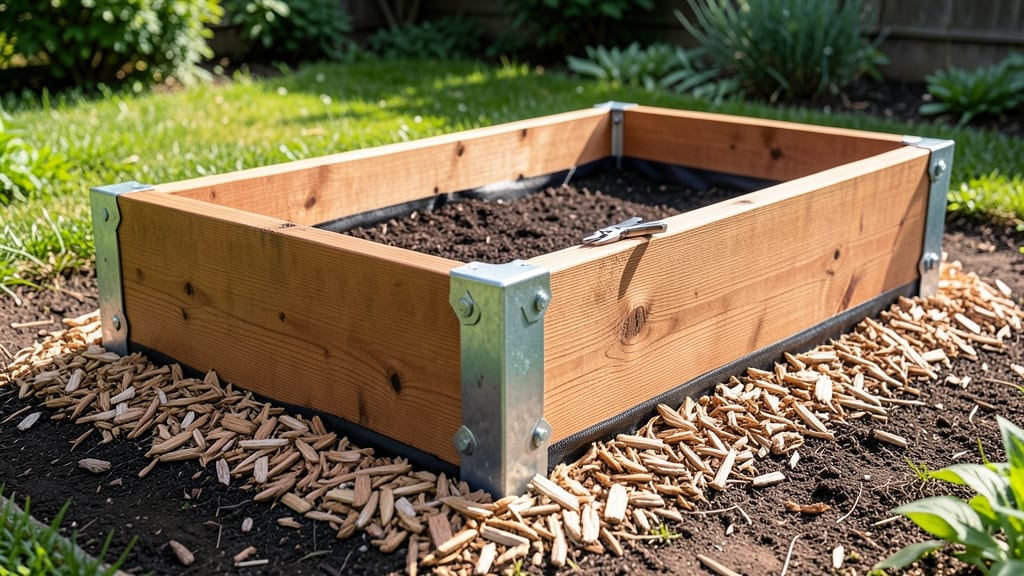
Cedar raised garden bed boards resist rot and last for years—my first set is still sturdy after five seasons of heavy use. 🌱 The right wood makes all the difference between a flimsy frame that warps by summer and a lasting structure that handles rain, snow, and everything in between.
I’ve tested cedar, redwood, and composite over the years, and cedar wins for durability without the chemical treatment needed for pine. You’ll need 2x6 or 2x8 boards (8 feet long for standard beds) and basic tools—a drill, screws, and a level.
Cedar’s natural oils keep bugs away and prevent splitting, but proper spacing and corner brackets add extra strength. A 12-inch deep bed works for most vegetables, while deeper beds (18 inches) are better for root crops like carrots or potatoes.
By summer’s end, you’ll have a frame that stays square, resists warping, and looks as good as the day you built it. The soil stays loose, drainage improves, and weeds stay out—plus, you avoid the back pain of bending over a traditional in-ground plot.
For extra longevity, add a landscaping fabric barrier between the wood and soil. Whether you’re building a single 4x8-foot bed or a series of connected planters, cedar’s the smart choice. Here’s how to pick the right boards and assemble them like a pro—no prior experience required.
📚 In This Guide
- What you need
- Instructions
- Tips and common mistakes
- Wrapping up and next steps
What you need
- ● Cedar boards – 4 pieces, each 2x6 inches (actual dimensions: ~1.5" x 5.5"), cut to your desired bed length (e.g., 8 ft for a 4x8 ft bed). Cedar resists rot and insects naturally!
- ● Galvanized or stainless steel screws – 2.5" to 3" deck screws, ~16-20 screws (4 per corner + extra for reinforcement). Avoid rust-prone nails!
- ○ Corner brackets (optional but recommended) – 4 galvanized L-brackets for extra stability.
- ● Landscape fabric or hardware cloth – 1 piece, slightly larger than your bed’s base to block weeds and pests.
- ● Soil mix – High-quality garden soil (e.g., 60% topsoil, 30% compost, 10% perlite/sand for drainage).
- ● Measuring tape & pencil
- ● Circular saw or handsaw (for cutting cedar)
- ● Drill/driver (for screws)
- ● Speed square (for precise angles)
- ● Work gloves & safety goggles
- ● Level (to ensure your bed is even!)
- ● Staple gun (for securing landscape fabric)
- ● Wood preservative – Extends cedar’s life even further.
- ● Drainage holes – Drill ¼" holes in the bottom boards if needed (for wet climates).
- ● Edging stones or pavers – Adds a polished look and prevents soil spillover.
Step-by-step guide to building cedar raised garden bed frames
Here's how I assemble sturdy, rot-resistant cedar frames that last for years of heavy planting.
🪴 Step 1: Measure and Cut Boards to Exact Dimensions
Start by measuring your garden space. For a 4' x 8' bed, you'll need two 8-foot boards for length and two 4-foot boards for width. Cedar naturally resists rot, but I always treat the cut ends with cedar-safe wood preservative to extend their life even further. Use a circular saw with a fine-tooth blade to make clean cuts—uneven edges will show when assembled.
Here's the thing—measure twice, cut once. Double-check your measurements before cutting. I mark all cuts with a pencil and 4-foot measuring tape to ensure perfect corners. For a 4-foot width, your corner boards should be cut at a 45-degree angle to create a snug fit. Use a speed square to make precise angle marks before cutting.
✂️ Step 2: Assemble the Frame with Corner Joinery
Lay out your boards in a rectangle and test-fit the corners. For a strong connection, I use galvanized deck screws (3-inch length) at each corner, pre-drilling holes to prevent splitting. Start with one corner, then attach the adjacent boards before securing the final corner. This keeps everything square during assembly.
For extra stability, I add 2x4 stakes as internal supports at 2-foot intervals along the length. These prevent the boards from bowing under soil weight. Space the screws about 1 inch from the board edges—this keeps the wood from splitting when you tighten them. A cordless drill makes this go faster, but a hand drill works too if you take your time.
☀️ Step 3: Reinforce and Level the Frame
Before adding soil, check for level in all directions. I use a 4-foot level placed along both lengthwise and widthwise axes. Adjust by tapping the frame upward with a rubber mallet if needed—never force it, or you'll warp the cedar. For extra reinforcement, I add metal corner braces at each joint. These distribute weight evenly and prevent the frame from spreading over time.
This is the moment that matters: bury the bottom 1-2 inches of the frame into the ground. I dig a shallow trench along the perimeter first, then lower the frame into place. This prevents shifting from seasonal ground movement. For windy locations, I stake the frame at 4-foot intervals using galvanized metal stakes driven into the ground at a 45-degree angle.
🌱 Step 4: Add Landscape Fabric and Fill with Soil
Line the bottom of the frame with landscape fabric to block weeds and grass from invading your soil. Secure it with landscape staples along the edges. Then, fill the bed with a 12-inch layer of soil. I mix 6 inches of high-quality garden soil with 6 inches of compost for drainage and nutrients. Water the soil lightly after filling to settle it.
Don't overfill—leave 1 inch below the top edge for mulch or additional soil later. I always add a 2-inch layer of mulch on top to retain moisture and suppress weeds. For year-round planting, I use straw mulch in summer and pine straw in winter. This keeps the soil temperature stable and reduces watering needs.
Tips & tricks for perfect cedar raised garden bed frames
Don't let small mistakes turn your project into a headache—these key strategies will ensure your cedar frames stand the test of time and seasons.
Precision Cutting Pays Off: When cutting your 4-foot width boards at a 45-degree angle for corners, take an extra 30 seconds to verify the angle with your speed square. I've seen too many projects where corners didn't align perfectly because of rushed angle cuts. The 45-degree bevel creates a tight joint that won't wobble when you add soil weight. Pro tip: Use masking tape along the blade guide on your circular saw to create a consistent reference line for repeat cuts.
Screw Placement Strategy: The 1-inch spacing from board edges when driving your 3-inch galvanized deck screws is non-negotiable—it prevents splitting. But here's what nobody tells you: pre-drill your pilot holes 1/16-inch smaller than your screw diameter. This creates a snug fit that resists loosening over time. For the 2-foot internal supports, I stagger the screws in a zigzag pattern rather than straight lines to distribute weight more evenly.
Leveling Like a Pro: Your 4-foot level check should happen in both directions, but don't stop there. I also run a string line diagonally from corner to corner—if it's not perfectly taut, you've got a wonky frame. For adjusting, use a rubber mallet to gently tap the frame upward rather than downward, which can compress the soil underneath. And if you're working with uneven ground, consider adding gravel pads (optional) under the corners before burying the frame.
Soil Layering Secrets: That 12-inch soil layer might seem like a lot, but it settles over time. I fill mine in 3-inch increments, lightly tamping each layer with a board to prevent air pockets. For the 6 inches of compost, I mix in a handful of perlite or vermiculite (optional) to improve drainage without compromising moisture retention. The 2-inch mulch layer should be fluffed evenly—packed mulch can suffocate plant roots and create anaerobic conditions.
Pro Tips for Raised Garden Bed Boards
- Don't let small mistakes turn your project into a headache—these key strategies will ensure your cedar frames stand t...
- Precision Cutting Pays Off: When cutting your 4-foot width boards at a 45-degree angle for corners, take an extra 30 ...
- Screw Placement Strategy: The 1-inch spacing from board edges when driving your 3-inch galvanized deck screws is non-...
Frequently asked questions
Got questions about raised garden bed boards? You’re not alone! Here are answers to the most common concerns—from setup to long-term care—so you can build with confidence.
What’s the best wood for raised garden bed boards?
Cedar is the gold standard—naturally rot-resistant, aromatic, and long-lasting (10+ years untreated). Alternatives like redwood or black locust also work well. Avoid pressure-treated wood (chemicals leach into soil) or untreated pine (rots faster). Pro tip: If cedar’s pricey, opt for cedar-treated lumber (non-toxic) or recycled plastic lumber for durability.
How long do raised garden bed boards last?
With proper care, cedar boards last 10–15 years (longer in dry climates). Check for cracks or splinters annually; seal with food-safe linseed oil every 2–3 years. If boards warp or rot, replace them—don’t wait! Pro tip: Elevate beds slightly (6–12 inches) to improve drainage and extend lifespan.
Are there cheaper alternatives to cedar boards?
Yes! Consider:
- Recycled plastic lumber: Won’t rot, but less breathable (may need drainage holes).
- Composite wood: Blends wood fibers with plastic; mid-range cost and durability.
- Salvaged wood: Check local listings for untreated, sturdy pallets or fencing (sand and seal first!).
Do I need to treat or seal cedar garden bed boards?
Untreated cedar is safe but benefits from a food-safe sealant (like linseed oil or beeswax) to repel moisture. Avoid petroleum-based stains—they can harm plants. Reapply every 2–3 years or when boards look dry. Pro tip: Skip sealing if using cedar-treated lumber (check for "ACQ-free" labels).
How do I prevent raised bed boards from warping or splitting?
Warping happens from moisture imbalance. To prevent it:
- Space boards ¼-inch apart (allows airflow and expansion).
- Use corner brackets (not nails) to reduce stress.
- Avoid overwatering soil—keep beds well-draining.
- Store boards flat and dry before assembly.
Wrapping up and next steps
Building a raised garden bed with cedar boards isn’t just a project—it’s an investment in long-lasting, low-maintenance, and productive gardening. Whether you’re a beginner or a seasoned green thumb, these frames elevate your plants, protect your back, and keep weeds at bay.
Now that you’ve got the materials, tips, and answers you need, it’s time to roll up your sleeves and get growing! 🌱
Your next step? Sketch your design, gather your tools, and start assembling—your future harvest will thank you! Need a little extra inspiration? Browse cedar board options or explore creative bed layouts to make your garden truly one-of-a-kind.