
Mower
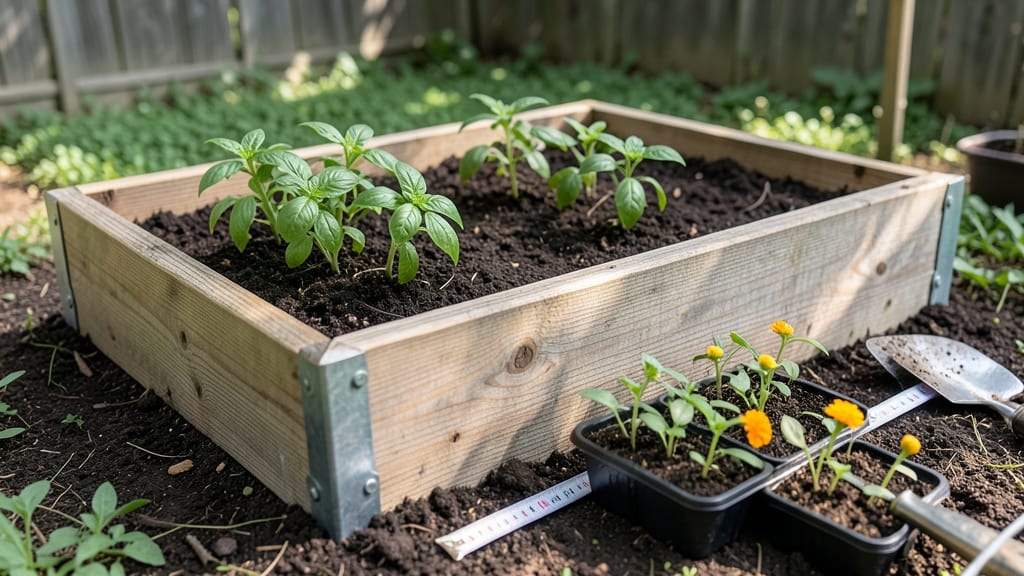
A 12-inch raised bed height gives roots room to stretch while keeping your back happy—no more bending over like you’re picking up groceries from the bottom shelf. 🌱 I learned the hard way that shallow beds mean shallow harvests, especially for deep-rooted veggies like carrots and potatoes.
The magic number balances soil depth, drainage, and ease of planting without sacrificing your knees. Most vegetables thrive in 12 inches of soil, but deeper beds (18+ inches) let you grow root crops like sweet potatoes or asparagus.
Shallow beds (6-8 inches) work for herbs, lettuce, or shallow-rooted flowers, but you’ll trade depth for accessibility. My 12-inch beds strike the perfect balance—I can kneel comfortably while still growing everything from tomatoes to radishes. The real game-changer? Drainage and weed control.
A 12-inch height keeps soil from compacting, prevents waterlogging, and makes weeding a breeze. You’ll notice healthier plants with fewer pests creeping in from the ground. Plus, the extra height means you can fill it with nutrient-rich soil every season without worrying about soil depletion.
For accessibility, add 2-3 inches of lumber to the sides—enough to keep soil from spilling but not so tall you need a step stool. If you’re gardening with kids or mobility challenges, consider 14-16 inches for easier reach.
The key is testing your own comfort while matching the bed to what you’re growing.
📚 In This Guide
- What you need
- Instructions
- Tips and common mistakes
- Wrapping up and next steps
What you need
- ● Lumber: 2x6 or 2x8 pressure-treated or cedar boards (rot-resistant) – at least 8 pieces, 8 feet long each (for a standard 4x4 ft bed).
- ● Screws: 2.5-inch exterior deck screws (galvanized or stainless steel) – ~50 screws.
- ○ Corner brackets: 4 galvanized metal corner braces (optional but recommended for extra stability).
- ● Landscape fabric: 1 roll (to block weeds and retain moisture).
- ● Soil mix: High-quality garden soil, compost, and perlite (for drainage) – ~1 cubic yard per 4x4 ft bed.
- ● Tools: Tape measure
- ● Drill + drill bits
- ● Circular saw or handsaw
- ● Level
- ● Staple gun (for landscape fabric)
- ● Gloves + safety glasses
- ● Wood stain or paint (for longevity and aesthetics).
- ● Hardware cloth (to deter burrowing pests).
- ● Drip irrigation kit (for efficient watering).
- ● Post caps or decorative trim (for a polished look).
Step-by-step guide to building a 12-Inch raised bed
Here’s how to construct the ideal 12-inch raised bed—the perfect balance for root depth, drainage, and easy maintenance.
🪴 Step 1: Plan Your Raised Bed Layout and Dimensions
Measure your garden space and mark the bed’s footprint with stakes and string. A 4-foot by 8-foot design fits most tools and provides ample planting area. Avoid placing beds directly against fences or walls—they’ll need at least 12 inches of clearance for airflow and access. I like to sketch a simple diagram first to visualize how the bed will fit into my layout.
For accessibility, keep the bed’s width under 4 feet so you can reach the center without stepping inside. The 12-inch height (measured from the base to the top edge) is ideal for most vegetables, herbs, and flowers—deep enough for root systems but not so tall that it becomes difficult to load soil. Use a level to ensure the base is perfectly flat before building.
🌱 Step 2: Build the Frame with Rot-Resistant Materials
Assemble the frame using untreated cedar, redwood, or composite lumber—these materials resist rot and last for years. Cut 2x6 or 2x8 boards to your desired dimensions (e.g., 4-foot widths and 8-foot lengths for a standard bed). The 12-inch height is achieved by stacking two layers of 6-inch-high boards or using single 12-inch-tall boards if available.
Use galvanized or stainless steel screws (not nails) to secure the corners—this prevents warping over time. I reinforce the corners with L-brackets for extra stability, especially if the bed will be walked on occasionally. Leave a small gap (¼ inch) between boards to allow for natural expansion and contraction. If using untreated wood, apply a non-toxic wood sealant to extend its lifespan.
💧 Step 3: Layer the Bed for Optimal Drainage and Soil Structure
Start with a 4-inch layer of carbon-rich material at the bottom—this could be cardboard, landscape fabric, or untreated wood chips—to prevent weeds from invading from below. Next, add a 2-inch layer of coarse material like gravel, bark, or broken bricks to improve drainage. This layer ensures excess water doesn’t pool at the roots.
Fill the remaining 6 inches with a custom soil mix: blend equal parts garden soil, compost, and perlite or coarse sand. I like to add a handful of worm castings to boost microbial activity right from the start. Avoid filling the bed completely at once—leave 2-3 inches at the top for settling. Water the soil mix thoroughly before planting to eliminate air pockets.
✂️ Step 4: Add Finishing Touches for Longevity and Aesthetics
Install drainage holes in the bottom of the frame if you haven’t already—this is critical for preventing waterlogging. Cover the holes with hardware cloth to keep out burrowing pests like voles. For a polished look, I edge the bed with landscape timbers or pavers, which also help contain soil and add a finished appearance.
Top off the bed with 2-3 inches of mulch (such as straw or shredded leaves) to retain moisture and suppress weeds. This layer will break down over time, so plan to replenish it seasonally. If your bed is exposed to heavy rain, consider adding a drip irrigation system or soaker hoses to deliver water directly to the roots without disturbing the soil.
☀️ Step 5: Plant and Maintain for Long-Term Success
Wait 1-2 weeks after filling the bed to let the soil settle and microbial activity stabilize. Plant deep-rooted crops like tomatoes, carrots, and potatoes in the center, where soil depth is greatest. Shallow-rooted plants like lettuce, radishes, and herbs thrive near the edges. I always start with fast-growing cover crops like clover to protect the soil between seasons.
Monitor the bed’s moisture level—12-inch beds dry out faster than ground-level plots, so water deeply 2-3 times per week during dry spells. Avoid overwatering; the soil should feel damp but not soggy when checked with your finger. Rotate crops annually to prevent soil depletion and disease buildup, and add compost every spring to replenish nutrients.
Tips & tricks for perfect 12-Inch raised bed construction
Took me a while to figure these out, so here's what nobody tells you about building a 12-inch raised bed that actually works long-term.
Material Selection Tip: When choosing between cedar, redwood, or composite lumber for your 12-inch frame, I've found cedar offers the best balance—it naturally resists rot and insects while remaining lightweight enough for DIY assembly. For beds that will be walked on occasionally, add L-brackets at all four corners—this prevents the frame from bowing under weight. The ¼-inch gap between boards might seem small, but it's essential for preventing wood warping when moisture levels change. I've seen many beds fail because this detail was overlooked.
Drainage Layer Strategy: That 4-inch carbon-rich layer at the bottom isn't just for weed suppression—it also creates a natural barrier that prevents soil from mixing with the drainage layer below. I recommend using cardboard with no tape (the tape doesn't break down) for this layer, as it breaks down completely over time, adding organic matter to your soil. The 2-inch coarse material layer should be something with larger particles—gravel works best because it won't compact over time like smaller materials might.
Soil Mix Optimization: The equal parts garden soil, compost, and perlite ratio is perfect for most vegetables, but I've learned that adding worm castings (about 1 cup per cubic foot of soil) gives plants an immediate nutrient boost. For heavy clay soils, increase the perlite to one-third of the mix to improve aeration. When watering that 6-inch soil layer, use a hose with a gentle spray nozzle—forceful watering can create compaction that roots hate. Let the water soak in completely before adding more.
Maintenance Hack: The 2-3 inches of mulch on top isn't just decorative—it's your first line of defense against weeds and moisture loss. I've found that straw mulch works better than leaves because it breaks down more slowly. For beds in full sun, consider adding 1-2 inches of coarse sand to the soil mix—this helps regulate temperature fluctuations that can stress plant roots. And here's a pro move: install your drip irrigation system before planting. You'll thank yourself later when you can water without disturbing settled soil.
Pro Tips for Raised Bed Height
- Took me a while to figure these out, so here's what nobody tells you about building a 12-inch raised bed that actuall...
- Material Selection Tip: When choosing between cedar, redwood, or composite lumber for your 12-inch frame, I've found ...
- Drainage Layer Strategy: That 4-inch carbon-rich layer at the bottom isn't just for weed suppression—it also creates ...
Frequently asked questions
Got questions about raised bed height?
You're not alone! Here are answers to the most common concerns—from planning to troubleshooting—to help you build the perfect garden space.
Why is 12 inches the recommended raised bed height?
A 12-inch height balances root depth (for most plants) with accessibility and drainage. It’s tall enough to accommodate deep-rooted veggies like carrots or tomatoes while keeping soil warm and reducing weed pressure. Plus, it’s easier on your back than bending over shallow beds! For taller plants (like corn or sunflowers), consider extending the height to 18–24 inches.
Can I start with a lower bed and add height later?
Many gardeners begin with a 6–8 inch bed (ideal for shallow-rooted herbs or greens) and add layers over time. Use untreated lumber or composite materials to stack frames, ensuring stability. Just leave 4–6 inches of space between layers for soil depth. Pro tip: Pre-drill screws to prevent wood splitting as you expand.
Will a taller bed drain better than a shorter one?
Yes—height improves drainage by allowing excess water to flow through the soil faster. Aim for a 12-inch minimum with 1–2 inches of gravel or landscape fabric at the bottom (optional but helpful for clay soil). Avoid over-filling with compacted soil, which can slow drainage. For heavy rainfall areas, consider French drains or sloped beds. Warning: Over-drainage can dry out soil quickly, so mulch helps retain moisture.
What’s the best material for a durable raised bed frame?
Durability depends on your climate and budget. Cedar or redwood resist rot naturally (lasts 7–10 years), while galvanized steel or composite lumber (like Trex) offer longevity with less maintenance. For budget-friendly options, untreated pine works short-term (replace every 3–5 years). Avoid pressure-treated wood with arsenic—opt for ACQ-treated lumber instead. Tip: Line the bottom with hardware cloth to deter burrowing pests!
Can I grow everything in a 12-inch bed?
Most vegetables, herbs, and flowers thrive in 12 inches, but deep-rooted plants like asparagus, rhubarb, or fruit trees need 18+ inches. For flexibility, design modular beds or use deep pockets (like straw bales or fabric grow bags) for exceptions. Shallow-rooted crops (e.g., lettuce, radishes) can even grow in 6-inch containers on top of your bed! Exception: Avoid heavy feeders like corn or squash unless you amend soil with compost annually.
What if my bed collapses or leans over time?
Collapse usually stems from poor foundation, rot, or uneven weight distribution. Fix it by:
- Reinforce corners with metal brackets or screws.
- Level the ground underneath (use gravel or pavers for stability).
- Replace rotted wood immediately—don’t wait!
- Add cross-bracing inside the frame for extra support.
Wrapping up and next steps
Choosing the right raised bed height—especially the 12-inch standard—can transform your gardening experience by boosting root growth, improving accessibility, and reducing strain.
Whether you're a seasoned gardener or just starting out, this height offers the perfect balance of depth and ease, making it a win-win for both your plants and your back! 🌱
Ready to elevate your garden? Start by measuring your space, gathering materials, and building your first bed—your future harvest will thank you! Happy gardening! 🌟