
Landscaping
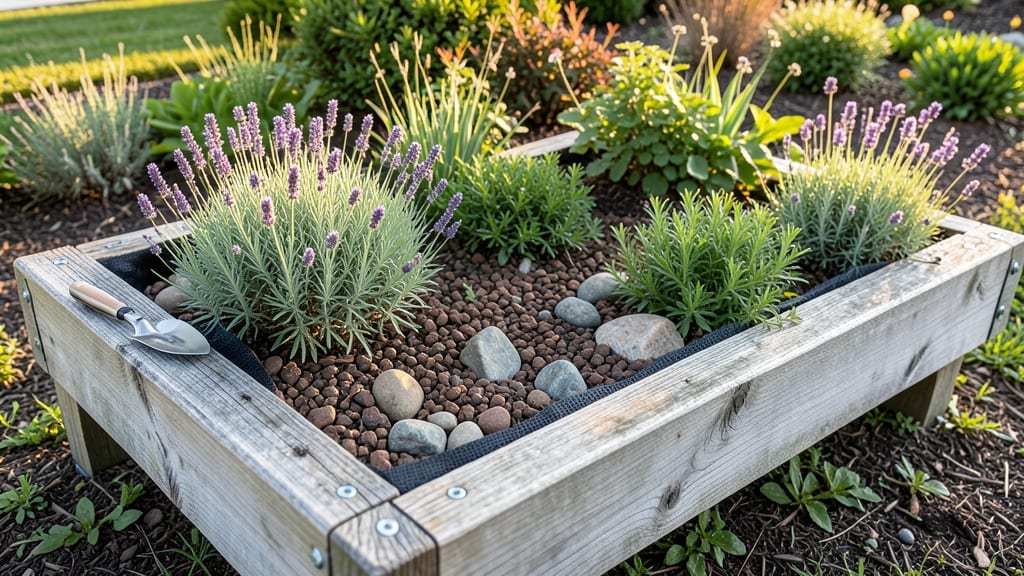
Landscape timber flower bed designs transform your yard into a cozy, private retreat while keeping maintenance simple. 🌿 The right cedar or treated wood borders create rustic charm that lasts for years—no more flimsy plastic edges or disappearing mulch. I’ve designed these beds to double as privacy screens, turning a simple border into a functional garden feature that frames your space beautifully.
Start with cedar for natural rot resistance or treated pine for budget-friendly durability. For a 6-foot-wide bed, use 6-inch-tall timbers spaced 12 inches apart—this creates enough room for plants to peek through while keeping weeds contained.
Mix low shrubs like boxwood with taller perennials like black-eyed Susans for layered privacy and color. The key is balancing structure with softness, so the wood doesn’t overpower the flowers.
You’ll end up with a garden that feels like a secret escape—fragrant lavender spilling over the edges, sunny marigolds brightening the corners, and the timber’s warm tones grounding the whole look.
These beds hold up against rain, snow, and curious critters while looking intentionally rustic, not makeshift. The best part? They age beautifully, developing a silvery patina that only adds to the charm.
Works for small urban gardens or sprawling backyards—just scale the timber size to your space. Whether you’re framing a cozy seating area or lining a walkway, this design keeps the focus on your plants while adding structure and privacy naturally. Let’s build something that lasts—and looks effortlessly put together.
📚 In This Guide
- What you need
- Instructions
- Tips and common mistakes
- Wrapping up and next steps
What you need
- ○ Pressure-treated timber: 4x4 posts (8–10 ft long) – 2–4 pieces (depending on bed size). Timber planks: 2x6 or 2x8 boards (6–8 ft long) – 10–15 pieces (for framing). Galvanized screws/nails: 3-inch deck screws – 50+ pieces (rust-resistant!). Landscape fabric: 3–4 ft wide roll – enough to cover bed base. Mulch: Cedar chips or bark – 2–3 cubic yards (for drainage & aesthetics). Soil: Topsoil or potting mix – 1–2 cubic yards (for planting). Optional: Stain/sealant (for weatherproofing timber) or decorative pebbles (for edging).
- ● Circular saw or miter saw (for cutting timber). Drill/driver (for screws). Measuring tape & speed square. Level (to ensure straight lines!). Shovel & wheelbarrow (for soil/mulch). Safety gear: Gloves, goggles, ear protection. 📝 Prerequisites Clear the area of weeds/debris (or mark boundaries with stakes). Check local building codes (if timber exceeds 3 ft in height). Plan your design: Sketch dimensions or use a grid for symmetry. Pro tip: 💡 Pre-drill screw holes to prevent timber splitting!
Step-by-Step guide to building rustic timber flower bed designs
Timber adds warmth and structure to any garden while creating natural privacy—here’s how to build a functional yet beautiful flower bed frame.
🪴 Step 1: Measure and Mark Your Flower Bed Layout
Start by sketching your design on paper first. I like to use a 12-foot tape measure and wooden stakes to mark the perimeter, ensuring the bed matches your space’s proportions. For a 4-foot wide bed (standard for easy maintenance), mark corners with stakes and stretch a garden twine between them to visualize the shape before digging.
Check for level using a 4-foot level—uneven beds create drainage issues and make planting difficult. Adjust stakes until the twine runs perfectly straight. This step prevents costly mistakes later when you’re ready to install the timber frame. I always double-check by walking around the outline to ensure the design flows naturally with your yard’s contours.
☀️ Step 2: Excavate and Prepare the Base
Dig down 6-8 inches along the marked perimeter to create a trench for the timber base. The depth depends on your timber thickness—6x6 posts need deeper trenches than 4x4 boards. Remove any rocks or roots, then level the trench bottom with a shovel or garden rake until it’s smooth and even.
For extra stability, especially in windy areas, I add a 2-inch layer of crushed gravel at the bottom of the trench. This improves drainage and prevents timber rot over time. Compact the gravel lightly with a hand tamper before proceeding—this ensures the frame stays square and doesn’t shift once the timber is in place.
🌱 Step 3: Install the Timber Frame
Cut your timber to size using a circular saw (measure twice, cut once—this is where most mistakes happen). For a 4-foot tall privacy screen, I use 6x6 posts at each corner and 4x4 boards for the horizontal supports. Secure the corners with galvanized metal brackets or exterior screws (stainless steel resists rust better).
Leave a 1-inch gap between the timber and soil to prevent moisture buildup. For added durability, treat the wood with a waterproof sealant before assembly. I like to space the vertical boards 1-2 inches apart—this creates a rustic look while allowing airflow to protect the wood from rot. Double-check the frame’s plumb with a level before backfilling the trench.
💧 Step 4: Backfill and Plant for Immediate Impact
Fill the trench with native soil mixed with compost (I use a 50/50 blend) to create a nutrient-rich base for your flowers. Tamp the soil lightly as you go to eliminate air pockets. For a 4-foot wide bed, I plant perennials along the back (like lavender or salvia) for height, then annuals in front (like geraniums or impatiens) for color.
Mulch with 3 inches of wood chips or shredded bark to suppress weeds and retain moisture. This step is critical—mulch also gives the design a finished, polished look while protecting the timber from direct soil contact. Water deeply after planting to settle the soil and encourage root growth. Within 2-3 weeks, your timber flower bed will look established and lush.
✂️ Step 5: Maintain for Long-Term Rustic Appeal
Inspect the timber frame twice a year (spring and fall) for signs of rot or pest damage. Sand rough spots with 80-grit sandpaper and reapply sealant every 2-3 years to extend the wood’s life. Prune back overgrown plants in early spring to maintain the bed’s shape and airflow.
For extra privacy, add climbing roses or clematis to the timber frame—these vines will intertwine with the wood over time, creating a natural, living screen. I also recommend grouping plants with similar water needs together to simplify maintenance. With proper care, your timber flower bed will remain a stunning, functional feature for 10+ years.
Tips & tricks for perfect rustic timber flower bed designs
A few key strategies will elevate your timber flower bed from functional to showstopping. Here's what I've learned after building several over the years.
Precision in Step 1 Pays Off: Don't rush the measuring and marking phase—this is where most layout problems begin. Use your 12-foot tape measure and 4-foot level together to verify both dimensions and level simultaneously. I like to mark the perimeter with wooden stakes and garden twine, then walk the outline while holding the level to spot any uneven spots before digging. This single step prevents costly adjustments later when the timber is already installed.
Base Stability is Non-Negotiable: The 6-8 inch deep trench with 2-inch crushed gravel base in Step 2 isn't just about drainage—it's about creating a solid foundation. I've seen timber frames shift after just one windstorm when this step was skipped. Compact that gravel thoroughly with your hand tamper until it feels firm like packed dirt. For extra security in windy areas, consider adding rebar stakes at each corner before backfilling.
Timber Treatment Matters More Than You Think: Before assembling your 4-foot tall frame in Step 3, apply a waterproof sealant to all timber pieces. I prefer outdoor-grade polyurethane that penetrates the wood rather than just sitting on the surface. The 1-inch gap between timber and soil is crucial—it prevents moisture wicking that leads to rot. Pro tip: Use a circular saw with a fine-tooth blade when cutting timber to reduce splintering, which makes assembly cleaner and more professional-looking.
Plant Selection Strategy: The 4-foot wide bed in Step 4 works perfectly because it allows you to create distinct layers. Place your tallest perennials (lavender, salvia) against the back timber for height, then add annuals (geraniums, impatiens) in front. For a cohesive look, choose plants with similar water needs—grouping them together simplifies irrigation. I've found that adding 3 inches of wood chips as mulch not only suppresses weeds but also creates a clean, finished appearance that makes the timber frame look intentional rather than makeshift.
Pro Tips for Landscape Timber Flower Bed Designs
- A few key strategies will elevate your timber flower bed from functional to showstopping. Here's what I've learned af...
- Precision in Step 1 Pays Off: Don't rush the measuring and marking phase—this is where most layout problems begin. Us...
- Base Stability is Non-Negotiable: The 6-8 inch deep trench with 2-inch crushed gravel base in Step 2 isn't just about...
Frequently asked questions
Got questions about creating stunning landscape timber flower bed designs?
You’re not alone! Here are answers to the most common queries to help you plan like a pro.
What’s the best type of timber for a durable flower bed frame?
Opt for pressure-treated pine or cedar—they resist rot and pests while blending beautifully with rustic designs. Avoid untreated wood, as it may warp or degrade faster. For a longer lifespan, consider composite lumber (though it’s pricier). Always seal the timber to boost durability!
When is the ideal time to install a timber flower bed?
Spring or early fall is perfect! Mild weather lets you work without extreme heat or cold. Avoid winter (frozen ground) or peak summer (drought stress). Pro tip: Prep the soil in advance—amend it with compost for healthier plants once your bed is built.
Can I build a timber flower bed on a budget?
Skip expensive materials by:
- Using reclaimed wood (check local salvage yards).
- Building a low-profile design (12–18" tall) to reduce timber costs.
- Skipping hardware—just notched corners work for stability.
How do I prevent timber from rotting in a flower bed?
Rotting is a common issue, but you can fight it with:
- Elevate the bed slightly (6–12" off ground) for airflow.
- Apply a wood preservative before planting.
- Use gravel or landscape fabric at the base to deter moisture buildup.
- Choose drought-tolerant plants to reduce excess water.
What plants thrive in timber-edged flower beds?
Pick low-maintenance, compact plants to avoid overcrowding:
- Perennials: Lavender, sedum, or hostas (great for height variation).
- Annuals: Petunias or marigolds (adds color fast).
- Ground cover: Creeping thyme or clover to fill gaps.
Wrapping up and next steps
Transforming your outdoor space with landscape timber flower bed designs isn’t just about aesthetics—it’s about creating a serene, functional retreat that blends rustic charm with practicality.
Whether you’re drawn to the cozy privacy of cedar screens or the timeless appeal of raised beds, these designs offer endless creativity while keeping maintenance simple. Now’s the perfect time to sketch your vision, gather materials, and bring your dream garden to life!
🌱 Your Next Step:
- Start small—pick one bed or screen to build confidence.
- Explore local timber suppliers for sustainable, weather-resistant wood.
- Sketch a layout (even on paper!) to visualize your design before digging in.