
Landscaping
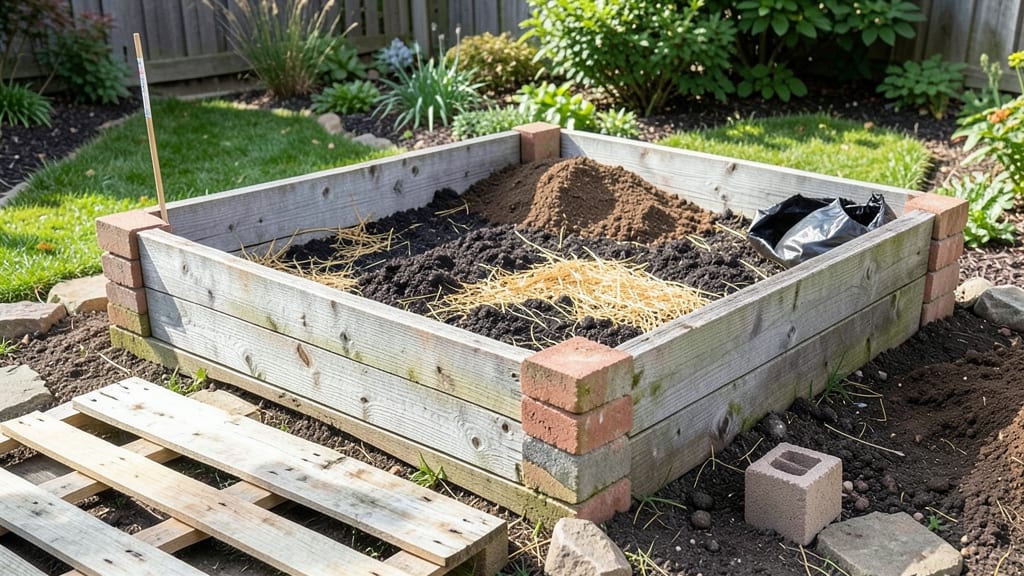
Your dream raised beds won’t break the bank—inexpensive raised bed ideas start with repurposed materials and a little creativity. 🌱 Last summer, I built three raised beds using old pallets, cinder blocks, and scrap lumber, and they’re still producing more tomatoes than my neighbors’ store-bought beds. The best part?
I spent less than $50 total and used what I already had lying around. The key to affordability is thinking outside the box (literally). Cinder blocks stack easily, pallet wood adds rustic charm, and even broken bricks can form sturdy edges.
For soil depth, aim for at least 6 inches—enough for roots to thrive without needing a mountain of dirt. Drainage isn’t tricky either: just add a layer of landscape fabric or rocks at the bottom to keep water flowing.
By the end of the season, you’ll have lush, productive beds that look intentional, not makeshift. The upcycled materials blend into your yard, and the harvests prove they’re just as sturdy as expensive kits. Plus, you’ll save money for next year’s seeds instead of pre-made beds.
Whether you’re working with a tiny balcony or a sprawling backyard, these ideas adapt. Start small, experiment, and watch your garden—and your wallet—thrive.
📚 In This Guide
- What you need
- Instructions
- Tips and common mistakes
- Wrapping up and next steps
What you need
- ● Base Structure: Wood (untreated cedar, redwood, or pressure-treated lumber—avoid chemically treated wood if growing edibles) – 4x 8-foot boards (2x6 or 2x8 inches) or equivalent
- ● OR Upcycled materials like pallets, cinder blocks, or old bricks (ensure they’re safe for gardening!)
- ● Hardware: Galvanized screws or nails (2–2.5 inches long) – ~50–100 pieces
- ○ Corrugated metal roofing or landscape fabric (optional but recommended for weed barrier)
- ● Filling: Cardboard or newspaper (for weed suppression layer)
- ● Compost, soil, or a mix of both (aim for 1–2 cubic yards per 4x8-foot bed)
- ● Drill or hammer
- ● Measuring tape
- ● Saw (hand saw, circular saw, or reciprocating saw)
- ● Level (to ensure your bed is even!)
- ● Staple gun (if using landscape fabric)
- ● Wood stain or paint (for longevity—use non-toxic options)
- ● Plastic edging or bricks to secure the sides
- ● Drip irrigation kit or soaker hoses
- ● Garden twine or zip ties (to reinforce corners)
Step-by-Step instructions for building inexpensive raised beds
Turn everyday materials into a thriving garden—no big budget required.
🪴 Step 1: Choose Your Base Materials
Start with sturdy, weather-resistant materials you already have or can find cheaply. Untreated wood like cedar or redwood lasts longest, but cinder blocks, bricks, or even stacked logs work too. I’ve built beds from old pallets, railroad ties (if untreated), and even repurposed dressers—just ensure they’re dry and stable. For a 4-foot by 8-foot bed, you’ll need about 12-16 pieces of material, depending on height. Aim for 12 inches deep to accommodate root growth and improve drainage.
Skip pressure-treated wood with arsenic (older types) or anything rotting—it’ll compromise your soil and plants. If using bricks or blocks, lay them in a staggered pattern for extra stability. Pro tip: Salvage yards often sell scrap lumber for pennies per board. Check local listings too—people frequently give away old fencing or decking for free.
☀️ Step 2: Build a Sturdy Frame
Arrange your materials in a rectangle, leaving a 4-inch gap between sections for drainage and root access. Secure corners with screws, brackets, or even heavy-duty staples if using wood. For cinder blocks, stack them in a herringbone pattern to prevent shifting. If using logs or bricks, line them up evenly and fill gaps with soil or gravel to lock them in place.
Here’s the thing—don’t skimp on stability. A wobbly bed will collapse under soil weight or when you’re planting. Test it by gently pressing down on each corner. If it rocks, add more supports or weight it down with rocks. For extra strength, add a crossbeam in the middle if your bed is longer than 6 feet. This keeps the sides from bowing outward over time.
🌱 Step 3: Layer for Drainage and Soil
Line the bottom with cardboard or landscape fabric to block weeds and grass from creeping up. Poke holes in the cardboard so water can drain through. Add a 2-inch layer of coarse material—gravel, broken bricks, or even crushed eggshells—to improve drainage. This prevents soggy soil and root rot, especially in rainy climates.
Next, fill the bed with a mix of native soil (if you have it) and organic matter. I like to use a 50/50 blend of garden soil and compost, but you can also layer in straw, leaves, or manure for nutrients. Avoid pure garden soil—it compacts easily and drains poorly. For a 4-foot by 8-foot bed, you’ll need about 1 cubic yard of soil mix. Spread it evenly and tamp it down lightly to remove air pockets.
💧 Step 4: Plant and Mulch
Now for the fun part—planting! Arrange your seedlings or seeds according to their spacing needs. Tall plants like tomatoes go in the back, shorter ones like lettuce in front. Water deeply right after planting to settle the soil around roots. For a 4-foot bed, you’ll need about 1-2 gallons of water per row, depending on how dry the mix is.
Top everything off with a 2-inch layer of mulch—straw, wood chips, or even shredded leaves—to retain moisture and suppress weeds. Mulch also keeps soil temperatures stable, which is a game-changer in hot or cold climates. Avoid fresh wood chips, though—they can rob nitrogen from the soil as they break down. Instead, use aged or composted mulch for the best results.
⏰ Step 5: Maintain and Upcycle as Needed
Check your bed regularly for signs of wear. If wood starts rotting, replace the affected pieces before they compromise the whole structure. Add compost or fresh mulch every 3-4 months to keep nutrients high. Raised beds dry out faster than in-ground gardens, so water deeply 2-3 times per week during dry spells, aiming for 1 inch of water per week.
Real talk: Your bed will last years if built right. I’ve had one made from old barn wood that’s still going strong after 5 seasons. When it’s time to refresh, disassemble the frame, clean the materials, and reuse them for a new bed. The key is adapting—if one material fails, swap it out without starting over. That’s the beauty of upcycling: you’re always learning and improving.
Tips & tricks for perfect upcycled raised beds
Here's what I learned after building (and fixing!) several raised beds over the years—these tricks save time, money, and frustration.
Material Selection Tip: When choosing wood, look for pieces that are at least 2x4s or thicker—thinner boards will warp over time. I've found that cedar or redwood lasts the longest, but even old barn wood or untreated pallets work if you seal the ends. For extra stability, use materials that are at least 6 inches wide—this prevents bending under soil weight. If you're using cinder blocks, check that they're solid and not cracked, as weak blocks can lead to uneven beds.
Stability Secret: The 4-inch gaps mentioned in Step 2 are crucial—don't skip them! These gaps allow water to drain freely and prevent soil from spilling out. For extra reinforcement, especially if your bed is longer than 6 feet, add a crossbeam in the center. I've seen many DIY beds fail because builders ignored this step, leading to collapsed sides. Test your frame by pressing down firmly on each corner—if it wobbles, add more supports or weight it down with rocks before adding soil.
Drainage Upgrade: In Step 3, the 2-inch layer of coarse material is your best friend for preventing soggy soil. If you're in a particularly rainy climate, consider doubling this layer to 4 inches. I've used everything from gravel to crushed bricks to even broken terracotta pots—whatever you have on hand. Pro tip: Save your eggshells! Crush them and mix them into the drainage layer—they'll add calcium to your soil as they break down over time.
Soil Mix Hack: For the 50/50 blend of garden soil and compost, don't overthink the compost source. Leaf mold (from shredded leaves left to decompose for a year) works just as well as store-bought compost. If you're using manure, make sure it's well-aged—fresh manure can burn plants. For a 4-foot by 8-foot bed, you'll need about 27 cubic feet of soil mix (since 1 cubic yard = 27 cubic feet). Spread it evenly and tamp lightly to remove air pockets—this prevents future settling that could leave gaps at the top.
Pro Tips for Inexpensive Raised Bed Ideas
- Here's what I learned after building (and fixing!) several raised beds over the years—these tricks save time, money, ...
- Material Selection Tip: When choosing wood, look for pieces that are at least 2x4s or thicker—thinner boards will war...
- Stability Secret: The 4-inch gaps mentioned in Step 2 are crucial—don't skip them! These gaps allow water to drain fr...
Frequently asked questions
Got questions about building inexpensive raised beds? You’re not alone!
Here are answers to the most common queries—from materials to maintenance—so you can get growing without breaking the bank.
What’s the cheapest way to build a raised bed?
Use free or upcycled materials like untreated pallet wood, cinder blocks, or even old bricks. Line the bottom with cardboard or landscape fabric to suppress weeds, and fill with a mix of soil, compost, and yard waste. A 4’x8’ bed can cost as little as $20–$50 if you DIY!
How long does it take to build a raised bed?
Most DIY raised beds take 1–3 hours for beginners, depending on size and materials. Break it into steps: assembling the frame (30 mins), adding hardware (20 mins), and filling with soil (1 hour). Pro tip: Invite a friend to speed up the process!
Can I use treated wood (like pressure-treated lumber) for raised beds?
While some treated wood is safe, opt for untreated or naturally rot-resistant woods (cedar, redwood, or cypress) to avoid chemical leaching into your soil. If you must use treated wood, choose ACQ-treated lumber (less toxic) and line the bed with heavy-duty plastic as a barrier.
What if my raised bed collapses or leans over time?
Collapse often happens due to uneven soil settling or weak materials. Reinforce the frame with corner braces or metal rebar stakes driven into the ground. For wooden beds, replace rotted planks immediately—delaying fixes can lead to bigger (and costlier) repairs.
Are there alternatives to traditional soil for filling raised beds?
Yes! Mix 50% topsoil with 50% compost or other amendments like:
- Leaf mold (free from fallen leaves)
- Peat moss (for moisture retention)
- Coconut coir (sustainable alternative)
- Sawdust (untreated, aged for 6+ months)
Wrapping up and next steps
Creating an inexpensive raised bed doesn’t have to break the bank—just a little creativity! With upcycled materials like pallets, bricks, or cinder blocks, you can build a thriving garden space that’s both budget-friendly and eco-conscious.
Whether you’re a beginner or a seasoned gardener, these ideas prove that big harvests start with small, smart investments.
Now that you’re inspired, roll up your sleeves and get planting! Start small with one bed, experiment with materials, and watch your garden grow. Happy gardening! 🌱✨