
Tools
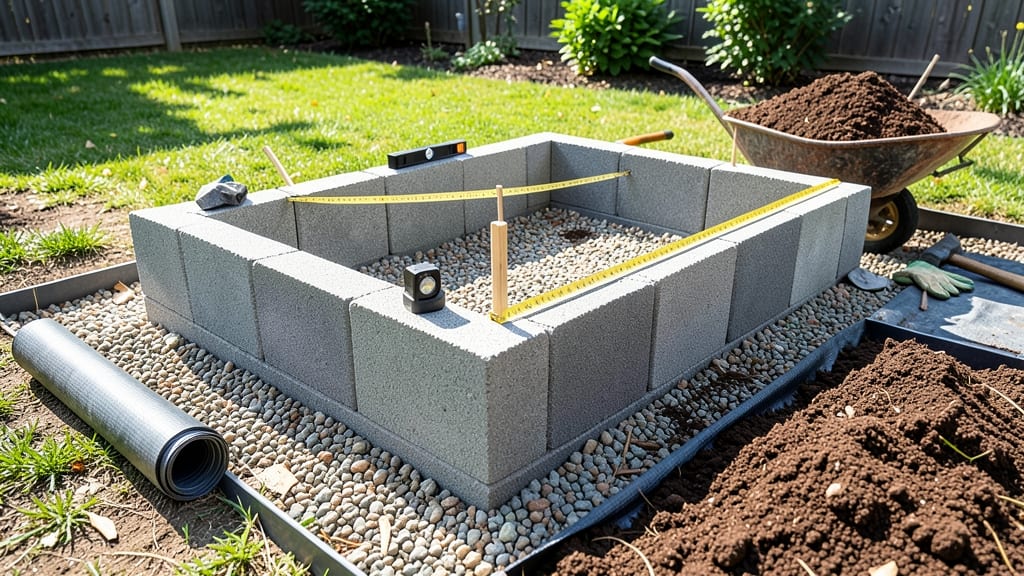
Building a raised garden bed with concrete blocks gives you a sturdy, custom-height frame that lasts for years. 🌱 I’ve used them for everything from vegetable plots to container gardens, and the results are always clean, level, and built to handle heavy soil.
The blocks stack like giant LEGO pieces, so you can adjust height for better drainage, easier access, or even wheelchair-friendly planting. You’ll need interlocking concrete blocks (like those used for retaining walls), a rubber mallet for adjustments, and a level to keep everything straight.
Optional extras—like landscape fabric under the blocks or pavers for a finished look—make the project even more professional. The best part? No digging, no rot, and no need to replace wood every few years.
Once assembled, you’ll fill it with 6-12 inches of quality garden soil, creating a productive, weed-free growing space that warms up faster in spring. My beds stay level and stable through rain and freeze-thaw cycles, and the blocks even double as a permanent edging for mulch or pathways.
This method works for any size garden, from a 4x8-foot veggie plot to a 2x4-foot herb bed. Let’s get those blocks stacked!
📚 In This Guide
- What you need
- Instructions
- Tips and common mistakes
- Wrapping up and next steps
What you need
- ● Concrete blocks (cinder blocks): 12–24 blocks (depending on bed size; standard 16" x 8" x 8" blocks work well).
- ● Landscape fabric: 1 roll (to block weeds and retain moisture).
- ● Garden soil or compost: 1–2 cubic yards (mix topsoil with compost for nutrient-rich planting).
- ● Gravel or sand: 1–2 bags (for drainage at the base).
- ○ Concrete block adhesive or mortar: 1–2 tubes (for securing blocks; optional if stacking dry).
- ● Wheelbarrow or shovel (for moving soil/blocks).
- ● Level (to ensure your bed stays even).
- ● Rubber mallet (for tapping blocks into place).
- ● Measuring tape (to plan dimensions).
- ● Garden gloves (for comfort and grip).
- ○ String and stakes (optional, for marking bed layout).
- ● Corrugated drainage pipe (to prevent waterlogging).
- ● Wooden edging or landscape timbers (for a polished finish).
- ● Plant markers or stakes (to label your garden sections).
Step-by-Step guide to building a concrete block raised garden bed
Here's how to create a sturdy, long-lasting bed that lets you customize height for roots and drainage.
🪴 Step 1: Plan and Measure Your Garden Bed Layout
First, sketch your design on paper. Standard concrete blocks (like 8x8x16 inch cinder blocks) create beds that are 16 inches wide (perfect for most plants) and 12 inches deep (ideal for root growth). Measure your space and mark the perimeter with stakes and string for a straight, level guide.
I always add 2-3 inches of gravel at the base for drainage—this prevents waterlogging and keeps roots healthy. If you're building against a fence or wall, leave 6 inches of clearance on the back side for easy access. For a 4-foot-long bed, you'll need about 10 blocks (5 on each long side and 2 on each end).
📏 Step 2: Lay the Foundation and First Block Layer
Clear the area of grass, weeds, or debris—you want a clean, level surface. For extra stability, I lay down a 4-inch layer of compacted gravel along the marked perimeter. This elevates the bed slightly and improves drainage from the bottom.
Start in a corner and place the first block with its open side facing inward. Use a rubber mallet to tap it gently into place—this ensures a snug fit without cracking. Check with a level to confirm it's perfectly plumb. For a 12-inch-tall bed, you'll stack 3 blocks high (each block is 8 inches tall, but the stacking creates a 12-inch interior height).
⚙️ Step 3: Stack Blocks and Secure the Corners
Place the second layer of blocks directly on top of the first, staggering the seams for added strength. Use a bag of concrete block adhesive (about 1 tube per 10 blocks) to bond the blocks together—this prevents shifting over time. I apply a thin bead along the top edge of each block before setting the next layer.
For corners, cut blocks in half with a masonry saw to create clean, right-angle fits. Secure the corners with 3-inch masonry screws (2 per corner) for extra stability. If your bed is wider than 4 feet, add a middle support block every 2 feet to prevent sagging.
🌱 Step 4: Add Landscape Fabric and Fill With Soil
Line the inside of the bed with landscape fabric to block weeds while allowing water to drain. Staple it to the inside edges of the blocks with a staple gun. Then, fill the bed with a mix of 60% topsoil and 40% compost—this gives plants the nutrients they need without being too dense.
Leave 2 inches of space at the top for mulch and watering. Tamp the soil lightly with your hands to remove air pockets, but don’t compact it too tightly—roots need room to grow. For a 4x8-foot bed, you’ll need about 2 cubic feet of soil per inch of depth.
✂️ Step 5: Reinforce and Prepare for Planting
If your bed is taller than 12 inches, add galvanized metal edging around the top to prevent soil from spilling out. For extra durability, I top the blocks with a 2x4 board along the inside edge—this creates a clean planting surface and keeps soil contained.
Water the bed thoroughly before planting to settle the soil. Now, it’s ready for your favorite vegetables, flowers, or herbs! The raised height makes weeding easier and improves drainage, so you’ll spend less time fighting the garden and more time enjoying the harvest.
Tips & tricks for building a sturdy raised garden bed
Building a raised bed this way takes patience, but these little details make all the difference between something that lasts and something that collapses.
Block Selection Matters: Not all concrete blocks are created equal. For this project, look for 8x8x16-inch cinder blocks with hollow cores—they're lighter to work with and provide natural drainage channels. If you can't find cinder blocks, standard concrete blocks work too, but they're heavier and may require extra help during assembly. I've found that blocks with interlocking edges (like the Lego-style ones) create a tighter fit, which prevents shifting over time.
Leveling is Non-Negotiable: In Step 2, when you're placing that first layer, take your time to check the level after every other block. A perfectly level base prevents water pooling and ensures your bed stays square. I use a 4-foot level (not just a small one) to verify the entire length at once. If you notice any uneven spots, tap the block gently with a rubber mallet until it sits flush. Trust me, skipping this step will come back to haunt you when your bed starts leaning.
Adhesive Application Technique: When you're bonding the blocks in Step 3, don't just squirt adhesive randomly. Apply a thin, continuous bead along the top edge of each block before setting the next layer—this creates a strong bond without wasting product. I've learned the hard way that globs of adhesive can actually attract pests, so keep it neat. For extra strength in windy areas, add a second bead vertically on the inside face of each corner block.
Soil Mixing Pro Tip: In Step 4, when combining your 60% topsoil and 40% compost, don't just dump them together. Mix them in layers—start with a 2-inch layer of compost at the bottom (this prevents compaction), then alternate with topsoil as you fill the bed. This creates better drainage and root penetration throughout. For heavy clay soil areas, add 10% perlite or vermiculite to improve aeration—just mix it in with the topsoil layers.
Pro Tips for Build A Raised Garden Bed With Concrete Blocks
- Building a raised bed this way takes patience, but these little details make all the difference between something tha...
- Block Selection Matters: Not all concrete blocks are created equal. For this project, look for 8x8x16-inch cinder blo...
- Leveling is Non-Negotiable: In Step 2, when you're placing that first layer, take your time to check the level after ...
Frequently asked questions
Got questions?
Building a raised garden bed with concrete blocks is simple, but every gardener has unique needs. Here are answers to the most common questions to help you get started with confidence!
What’s the best size for a raised garden bed?
Aim for 4’ x 8’ (the most common size) to balance space efficiency and accessibility. For smaller yards, try 3’ x 6’—it’s easy to reach the center without stepping inside. Avoid widths over 4’ to prevent soil compaction. Pro tip: If you’re growing tall plants like tomatoes, leave 18–24” of space between beds for airflow!
When is the best time to build a raised garden bed?
Build 6–8 weeks before planting to let soil settle and warm up. Spring or early fall are ideal—avoid extreme heat or freezing temps, which can stress materials. Pro tip: If you’re in a cold climate, build in late winter to give soil time to decompose and warm for spring planting!
Can I use cinder blocks instead of concrete blocks?
Yes! Cinder blocks (made from fly ash) are lighter and cheaper, but concrete blocks are denser and more durable. If using cinder blocks, reinforce corners with rebar or galvanized screws to prevent shifting. Pro tip: Line the bottom with landscape fabric to block weeds and stabilize the bed.
How do I fix a wobbly or uneven bed?
Unevenness usually happens if the ground isn’t level or blocks aren’t stacked straight. Troubleshoot:
- Check for dips or mounds in the ground—level with a shovel before building.
- Use a rubber mallet to tap blocks into place gently.
- Fill gaps with gravel or sand for stability.
What’s the best soil mix for a concrete-block raised bed?
Use a 60% topsoil, 30% compost, and 10% perlite/sand blend for drainage and nutrients. Avoid pure garden soil—it compacts easily. Pro tip: Test soil pH (most veggies prefer 6.0–7.0) and amend with lime or sulfur if needed. Add a 2–3” layer of mulch to retain moisture!
Wrapping up and next steps
Building a raised garden bed with concrete blocks is a game-changer for any gardener—whether you're a beginner or a seasoned green thumb! 🌱 With this sturdy, customizable, and low-maintenance design, you’ve got the perfect foundation for thriving plants, better soil control, and even easier access.
Now that you’ve got the know-how, it’s time to roll up your sleeves and get planting!
Your next step? Pick your plants! Research what grows best in your climate, then sketch out your garden layout—don’t forget to leave space for pathways. Happy gardening! 🌿