
Tools
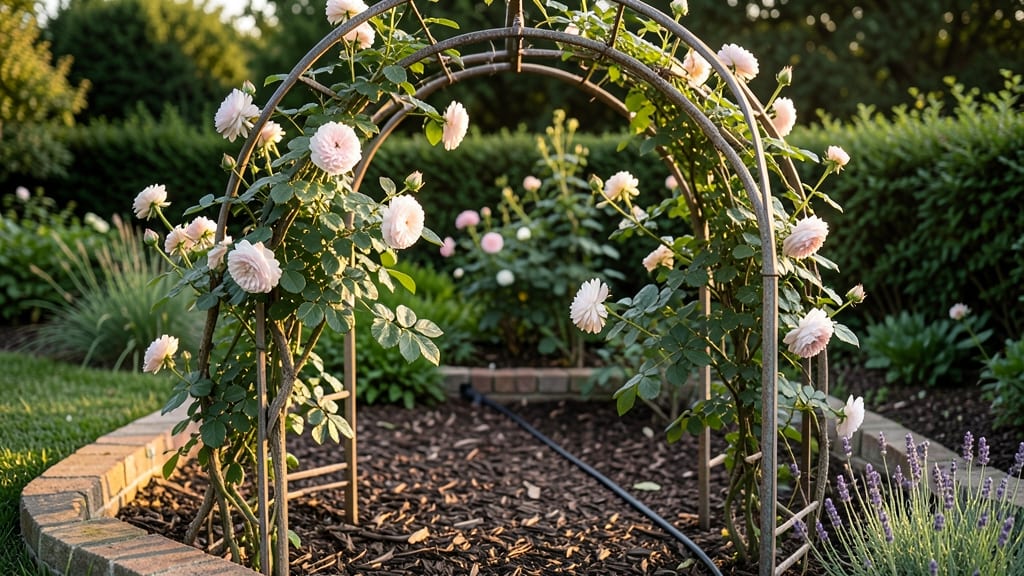
A garden bed setup with arch transforms a flat plot into a vertical paradise where vines climb, flowers cascade, and every season feels like a celebration. 🌿 I built my first arch after struggling with flimsy trellises that collapsed under cucumbers—this one stays put, looks intentional, and turns a 4x8-foot bed into a year-round display that neighbors admire (and envy).
The secret lies in PVC piping and galvanized brackets, which handle weight better than wood and resist rot. You’ll need 4-6 pipes, a saw, and a drill, plus plants that thrive climbing—think morning glories, clematis, or even dwarf fruit trees for a whimsical touch.
The arch itself takes under 2 hours to assemble, and the payoff? Double the growing space without sacrificing your lawn.
Once built, layer plants strategically: fast growers (like beans) at the base, medium climbers (roses) in the middle, and top-heavy vines (passionflowers) at the peak. Add drip irrigation to keep roots happy, and you’ve got a low-maintenance, high-impact feature that works in any yard—even small patios.
Pro tip: Paint the arch to match your garden’s theme, and add solar lights for evening charm. The structure lasts 5+ years with minimal upkeep, and your plants? They’ll thank you with bigger blooms, more fruit, and shade when summer heats up.
📚 In This Guide
- What you need
- Instructions
- Tips and common mistakes
- Wrapping up and next steps
What you need
- ● Arch Structure: 1–2 sturdy arches (pre-made metal, PVC, or wood—choose based on size and durability)
- ○ Optional: Arch connectors or brackets (if assembling multiple sections)
- ● Frame & Support: 4–6 wooden posts (4x4 or 6x6, pressure-treated, 6–8 ft tall)
- ● Galvanized screws or lag bolts (3–4 inches long, ½-inch diameter)
- ● Post anchors or concrete (for securing posts in ground)
- ● Bed Base: Landscape fabric (to block weeds, 10–12 ft wide)
- ● Cardboard or thick mulch (for weed suppression, cut to bed size)
- ● Soil & Mulch: High-quality garden soil or compost mix (1–2 cubic yards, depending on bed size)
- ● Mulch (straw, wood chips, or shredded leaves, 2–3 inches deep)
- ● Tools: Post hole digger or auger
- ● Level (to ensure arch and posts are straight)
- ● Drill or impact driver
- ● Measuring tape
- ● Wheelbarrow (for hauling soil)
- ● Shovel and rake
- ● Decorative lattice or trellis (for climbing plants like peas or roses)
- ● Weather-resistant paint or stain (for wooden arches/posts)
- ● Garden edging (stone, metal, or plastic to define the bed)
- ● Drip irrigation kit (for easy watering)
- ● Solar-powered lights (to highlight your arch at night!)
Step-by-Step guide for building a garden bed with an arch
Create a functional, beautiful raised bed that supports climbing plants while adding structure to your garden.
🪴 Step 1: Plan Your Garden Bed Layout and Materials
Choose a location with at least 6 hours of sunlight daily for most vegetables and herbs. I recommend a 4-foot by 8-foot bed—wide enough to walk across comfortably while reaching the center. Sketch your design, marking where the arch will sit; typically, I place it along the north or east side to avoid shading other plants.
For the arch, 2-inch thick PVC pipes cut into 6-foot lengths work perfectly—they’re lightweight yet sturdy. You’ll need 4 vertical posts (also PVC) and 2 horizontal braces per side. Measure your bed’s width and divide by 3 to determine pipe lengths for the arch segments. For a 4-foot bed, each arch segment should be 18 inches long. Real talk: measure twice, cut once—this saves you from redoing the whole structure.
☀️ Step 2: Prepare the Base and Install the Arch Frame
Mark the bed’s outline with stakes and string, then dig out the area to a depth of 6-8 inches. This ensures your bed sits flush with the ground while allowing room for drainage. I like to add a 2-inch layer of landscape fabric at the bottom to suppress weeds without restricting root growth.
Assemble the arch frame first. Connect the 6-foot vertical posts to the 18-inch arch segments using PVC cement or heavy-duty zip ties—this keeps the structure rigid. Place the frame in position and stake the vertical posts securely into the ground. The arch should curve gently upward, creating a 3-4 foot peak in the center. Double-check that the frame is level before proceeding; an uneven arch will throw off your planting rows later.
🌱 Step 3: Build the Raised Bed Frame and Add Support
Construct the raised bed frame using 2x6 lumber or cedar boards (cedar resists rot better). For a 4-foot by 8-foot bed, you’ll need four 8-foot lengths for the long sides and two 4-foot lengths for the short ends. Assemble the frame with galvanized screws or corner brackets—this ensures durability against weather shifts. I reinforce the corners with extra screws and wood glue to prevent sagging over time.
Attach the arch frame to the bed frame using L-brackets or heavy-duty straps. Position the arch so it’s centered along the long side of the bed. For extra stability, add diagonal braces from the top of the vertical posts to the bed frame. This prevents the arch from bowing outward under the weight of climbing plants like pole beans, cucumbers, or clematis. Once secured, fill the bed with 12-18 inches of high-quality garden soil mixed with 2-3 inches of compost—this gives roots plenty of room to grow.
✂️ Step 4: Plant and Train Climbing Plants for Year-Round Growth
Start by planting fast-growing annuals like cucumbers or pole beans at the base of the arch in early spring. These will climb the structure quickly, providing shade for cool-season crops like lettuce or spinach planted below. I like to interplant perennials like clematis or hops along the arch for long-term beauty and support. Space plants 12-18 inches apart to allow airflow and prevent disease.
As plants grow, gently weave vines through the arch segments to encourage upward growth. For heavier climbers like grapes or kiwi, add twine or soft ties to guide them along the structure. In fall, remove annuals but leave perennials in place—their woody stems provide winter interest and an early start next season. Here’s the thing: a well-supported arch bed keeps plants off the ground, reducing slug damage and making harvesting easier.
💧 Step 5: Maintain and Extend the Season
Water deeply 2-3 times per week during the growing season, focusing on the base of the arch where most roots will be. Use drip irrigation or soaker hoses to keep moisture consistent without wetting the leaves—this prevents fungal diseases. In late summer, add a 4-inch layer of mulch around the base of the bed to retain moisture and suppress weeds. I also install frost cloth over the arch in early fall to extend the growing season for tender plants like tomatoes or peppers.
Every 2-3 years, refresh the soil by removing 6-8 inches of old soil and replacing it with new compost and topsoil. This keeps nutrients high and prevents soil depletion. For winter interest, plant ornamental vines like jasmine or ivy along the arch—they’ll provide greenery even when other plants are dormant. The key is balancing structure with flexibility: your arch should support growth while letting you adjust plantings as seasons change.
Tips & tricks for perfect garden bed setup with arch
Between us, these small details make the difference between a sturdy, functional garden feature and one that collapses under the weight of summer vines.
Material Selection: For the arch segments, I've found that schedule 40 PVC pipes (the standard 2-inch thick ones) provide the perfect balance of strength and weight. If you're worried about aesthetics, consider painting the PVC with exterior-grade paint before assembly—it'll blend better with your garden's design. The 6-foot vertical posts should be buried at least 12 inches deep to prevent leaning, especially in windy conditions.
Leveling is Everything: When installing the arch frame in Step 2, use a level on both the vertical posts and the curved segments. I've seen arches that look perfect when assembled but become crooked when staked into the ground. Take the extra 10 minutes to adjust now—it'll save you from having to disassemble and redo the entire structure later. A slight tilt can cause uneven pressure on one side, leading to sagging over time.
Soil Mix Matters: The 12-18 inches of high-quality garden soil should be a mix of topsoil, compost, and perlite or vermiculite for drainage. I recommend using a soil test kit to check pH levels before filling your bed—most vegetables prefer a slightly acidic to neutral range (6.0-7.0). For the 2-3 inches of compost, I like to use a blend of well-rotted manure and leaf mold for structure, mixed with worm castings for nutrients.
Seasonal Planting Strategy: In Step 4, when planting annuals, consider staggering your plantings by 2-3 weeks for continuous harvests. For example, plant cucumbers in early spring, then again in late spring for a fall crop. The arch provides perfect shade for heat-sensitive plants like lettuce during summer months while allowing sunlight through in cooler seasons. This vertical space utilization maximizes your growing area without sacrificing yield.
Pro Tips for Garden Bed Setup With Arch
- Between us, these small details make the difference between a sturdy, functional garden feature and one that collapse...
- Material Selection: For the arch segments, I've found that schedule 40 PVC pipes (the standard 2-inch thick ones) pro...
- Leveling is Everything: When installing the arch frame in Step 2, use a level on both the vertical posts and the curv...
Frequently asked questions
Got questions about setting up a garden bed with an arch? You’re not alone! Here are some of the most common concerns—and their straightforward solutions—to help you get started with confidence.
What’s the best time of year to install an arch-supported garden bed?
For most climates, early spring or late fall are ideal—when the ground isn’t frozen or waterlogged. This gives plants time to establish roots before extreme heat or cold. If you’re in a mild zone, you can even install arches in winter for early spring planting!
How wide should the base of the arch be for stability?
Aim for a base that’s at least 12–18 inches wide (or wider for taller arches). This prevents tipping, especially in windy areas. For extra stability, use concrete footings or heavy landscape blocks at each base corner. Think of it like a sturdy bridge—wide foundations = less wobble!
Can I use an arch for raised beds, or is it only for in-ground gardens?
Arches work for both raised and in-ground beds. For raised beds, attach the arch to the frame’s sides (like a trellis) or bury the base posts slightly for support. Just ensure the arch material (like PVC or metal) is rust-resistant if it’s exposed to soil moisture.
What if my arch starts to sag or bend over time?
Sagging usually means the base isn’t secure or the material is overloaded. Reinforce the base with deeper stakes or concrete, and check for rot or rust in wooden/metal arches. For heavy climbers (like grapes or cucumbers), use galvanized wire or bungee cords to tie plants to the arch—distributing weight evenly.
Are there creative ways to decorate or camouflage the arch support?
Yes! Paint the arch to match your garden’s theme, or weave vines like morning glories or clematis to hide structural elements. For a rustic look, use wooden lattice panels on the sides. Pro tip: Add solar-powered string lights for a magical evening glow!
Wrapping up and next steps
Creating a garden bed setup with an arch isn’t just about aesthetics—it’s a game-changer for year-round planting, pest control, and even your garden’s curb appeal! 🌱 With the right materials, a sturdy design, and a little creativity, you’ll transform your space into a thriving, functional oasis.
Whether you’re a seasoned gardener or just starting out, this setup makes tending to your plants easier and more enjoyable.
Now that you’re ready with your arch-supported garden bed, take the next step: plant your first row of crops! Start with fast-growing veggies like lettuce or herbs, or go bold with climbing plants like cucumbers or beans.
Watch your garden flourish—and don’t forget to snap some photos to share your progress! 📸