
How To
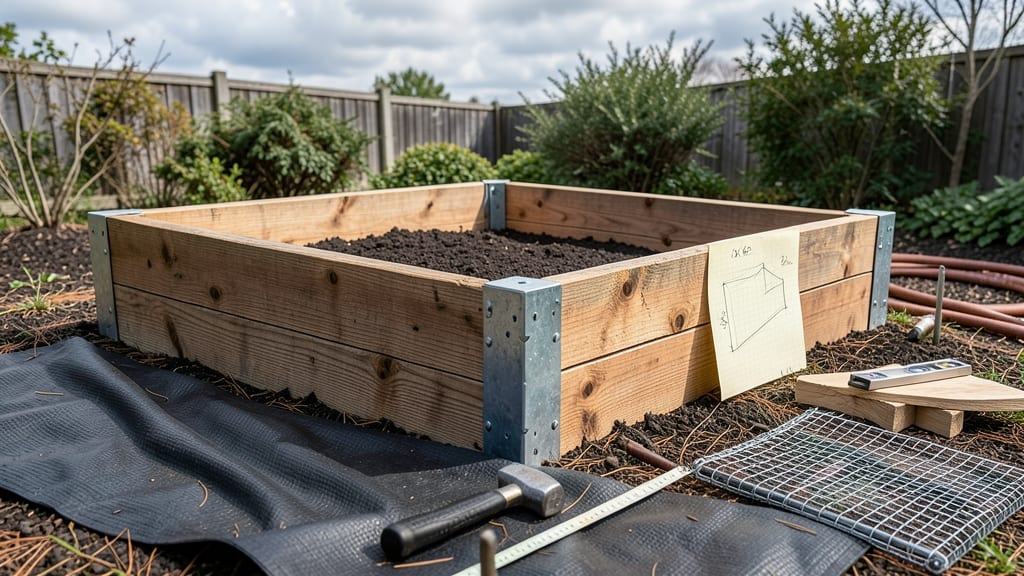
Cedar raised bed plans that outlast cheap lumber by years—without the toxic chemicals. 🌲 I built my first cedar bed five years ago, and it still looks brand-new while my pine neighbors have split and warped. The secret isn’t just the wood; it’s how you design it for airflow, drainage, and weight distribution.
Start with 2x6 cedar boards (naturally rot-resistant) for the frame, and 1x6 or 1x8 boards for the bottom. Standard dimensions are 4’x8’x12” deep, but adjust height for accessibility—24” works for wheelbarrow loading.
The key is pre-drilling screws to prevent splitting, and using galvanized hardware that won’t corrode. For extra longevity, add a landscape fabric barrier between wood and soil.
You’ll end up with a bed that stays square, resists warping, and blends seamlessly with your garden. The rich, honey-colored cedar smells amazing when fresh-cut, and it ages to a silvery-gray that pairs perfectly with perennials or veggies. Plus, the elevated design keeps critters out and your back happy.
Works for veggie gardens, herb spirals, or pollinator borders—just tweak the depth (12” for roots, 6” for shallow plants). The same plans scale down for small-space patios or up for community garden plots. Let’s get those boards cut!
📚 In This Guide
- What you need
- Instructions
- Tips and common mistakes
- Wrapping up and next steps
What you need
- ● Cedar lumber (premium grade, kiln-dried): 4 pieces – 2x6x8’ boards (for the long sides)
- ● 2 pieces – 2x6x4’ boards (for the short ends)
- ● 4 pieces – 2x6x4’ boards (for corner braces or supports, if needed)
- ● Exterior wood screws: 2½” deck screws (stainless steel or galvanized, ~100 screws)
- ○ Galvanized corner brackets (optional but recommended): 4 pieces (for extra stability)
- ● Landscape fabric or hardware cloth: 1 roll (to line the bottom and deter weeds/rodents)
- ○ Wood glue (optional): For reinforcing joints
- ● Outdoor wood sealant or stain: 1 quart (to protect against weather)
- ● Circular saw or miter saw (for precise cuts)
- ● Drill/driver (with screwdriver bit)
- ● Tape measure
- ● Speed square (for marking angles)
- ● Clamps (2-4, to hold pieces in place while assembling)
- ● Safety gear (gloves, goggles, ear protection)
- ● Level (to ensure your bed is even)
- ● Sandpaper (80-120 grit, for smoothing edges)
- ● A flat, level surface (grass, patio, or deck—remove rocks/weeds first!)
- ● Access to a water source (for filling the bed later)
- ● Soil mix (topsoil, compost, or a pre-mixed raised bed blend—~1 cubic yard for a 4’x8’ bed)
- ● Sturdy gloves and knee pads (trust us, your knees will thank you!)
Step-by-Step instructions for building cedar raised bed frames
Here's how to construct a durable, rot-resistant cedar frame that'll outlast cheaper woods by years.
🪴 Step 1: Cut and Prepare Cedar Lumber
Start with cedar lumber—its natural oils resist rot and insects perfectly. Cut 2x6 boards to your bed dimensions: 4 boards for the sides (length and width) and 4 corner posts (cut at 45 degrees for a snug fit). Use a miter saw for clean diagonal cuts on the corners—this prevents water pooling where boards meet.
Sand all edges lightly with 80-grit sandpaper to remove splinters. Cedar's rough texture can irritate hands, so smooth any areas you'll handle frequently. I like to stain the cut ends with cedar-safe preservative before assembly—this extra step prevents moisture wicking up from the soil.
✂️ Step 2: Assemble the Frame Structure
Lay out your 4 side boards in a rectangle. Place the pre-cut corner posts at each intersection and pre-drill ¼-inch holes through both the board and post to prevent splitting. Use 3-inch exterior deck screws (galvanized or stainless steel) to secure each corner—two screws per joint for maximum stability.
Check for square corners by measuring diagonally from one corner to the opposite. Both measurements should match within ¼ inch. If they don't, adjust the boards before tightening screws completely. This ensures your bed won't warp over time.
💧 Step 3: Reinforce and Add Support
For 4-foot-wide beds, add 2 horizontal supports (cut from 2x4 boards) about 12 inches apart between the corner posts. This prevents sagging under soil weight. Secure them with 2.5-inch screws into the corner posts—don't over-tighten or you'll crack the cedar.
Flip the frame over and apply waterproof landscaping fabric to the bottom. Staple it securely to block weeds and preserve soil quality. I use landscape staples every 6 inches around the edges—this keeps the fabric taut and prevents tearing when you fill the bed.
☀️ Step 4: Level and Position the Bed
Choose a sunny location with 6+ hours of light daily—cedar beds work anywhere, but veggies thrive with full sun. Use a level to ensure the frame sits evenly before filling. Adjust by adding gravel or pavers under low spots—cedar warps over time, so proper leveling now prevents uneven settling.
Leave 12 inches of clearance from other structures (like fences or decks) to allow airflow. Cedar needs room to breathe—poor circulation accelerates rot in humid climates. I like to position beds north-south to maximize sun exposure for plants.
🌱 Step 5: Fill and Condition the Bed
Add 12 inches of carbon-rich material (like composted leaves or straw) at the bottom to improve drainage. Then layer 6 inches of high-quality garden soil mixed with 2-3 inches of compost. Avoid filling to the top—leave 2 inches of headroom for settling.
Water the bed thoroughly after filling to help materials compact naturally. I like to let it sit 24 hours before planting—this gives the soil time to stabilize. Cedar beds dry out faster than ground soil, so plan to water 2-3 times weekly during dry spells.
Tips & tricks for perfect cedar raised bed frames
Took me years of trial and error to figure out these tricks—your cedar beds will thank you for these pro moves.
Material Selection: While cedar is naturally rot-resistant, not all cedar is created equal. Look for western red cedar specifically—it's the most durable for raised beds. If your local supply only carries cheaper cedar blends, consider adding an extra coat of cedar-safe sealant to the interior surfaces that'll touch soil. This prevents moisture absorption that can lead to premature rot, especially in humid climates.
Cutting Precision: When making those 45-degree corner cuts in Step 1, I can't stress enough how important it is to use a sharp miter saw blade. A dull blade will tear the wood fibers, creating weak points where water can seep in. Take the time to test your blade on scrap wood first—you'll notice the difference in clean, crisp cuts that prevent water pooling at the joints. This is where many DIY beds fail prematurely.
Assembly Technique: The ¼-inch pre-drilling in Step 2 isn't just about preventing splits—it's about creating a more stable frame. I've found that using a step bit for pre-drilling gives you cleaner pilot holes that make screwing together much easier. Also, when checking for square corners, I measure both diagonals and average the results—this accounts for any minor measurement variations in your tape measure. For beds over 4 feet wide, consider adding a third diagonal measurement for extra accuracy.
Long-Term Care: After your 24-hour settling period in Step 5, I recommend applying a fresh coat of cedar-safe preservative to all exterior surfaces before planting. This isn't just about aesthetics—it creates a moisture barrier that extends the life of your frame by years. Reapply every 2-3 years or whenever you notice the wood starting to gray. The preservative also makes cleaning up soil splatters much easier, keeping your beds looking fresh season after season.
Pro Tips for Cedar Raised Bed Plans
- Took me years of trial and error to figure out these tricks—your cedar beds will thank you for these pro moves.
- Material Selection: While cedar is naturally rot-resistant, not all cedar is created equal. Look for western red ceda...
- Cutting Precision: When making those 45-degree corner cuts in Step 1, I can't stress enough how important it is to us...
Frequently asked questions
Got questions about building and maintaining your cedar raised bed plans? You’re not alone—here are the most common concerns, answered clearly and concisely to help you get started with confidence!
Why cedar instead of other wood types?
Cedar is the gold standard for raised beds because it’s naturally rot-resistant (thanks to its high oil content) and won’t warp like pine or pressure-treated wood. It also ages beautifully with a silvery-gray patina over time. Plus, it’s lightweight yet sturdy—perfect for DIYers!
How long do cedar raised beds last?
With proper sealing (every 2–3 years), a cedar raised bed can last 15–25 years—or even longer if you avoid direct soil contact (use landscape fabric or pavers at the bottom). Many homeowners report cedar beds outlasting cheaper alternatives by decades with minimal upkeep.
Do I need to seal cedar raised beds?
Yes! While cedar is naturally resistant, sealing extends its life and prevents moisture absorption. Use a water-based, non-toxic sealant (like spar urethane) and reapply every 2–3 years. Skip the stain if you love the natural look—cedar’s gray weathering is a charm!
What’s the best time of year to build?
Spring or early fall are ideal—spring lets you plant immediately, while fall gives roots time to establish before winter. Avoid extreme heat (warping risk) or freezing temps (slower curing). Pro tip: Build before your first planting season for a head start!
Can I use cedar scraps or leftover wood?
Mixing cedar scraps (for sides) with cheaper lumber (like pine for the base) cuts costs. Just ensure the soil-contacting parts (like the inner frame) are 100% cedar. Avoid pressure-treated wood—it can leach chemicals into your garden soil.
How do I prevent pests like termites or carpenter ants?
Cedar’s natural oils deter many pests, but take extra steps for termites:
- Elevate beds 6–12 inches off the ground (use bricks or pavers).
- Store firewood away from the bed.
- Inspect annually for tunnels or sawdust near joints.
- Apply borate-based wood preservative if termites are common in your area.
Will cedar raised beds survive freezing winters?
Yes! Cedar handles freeze-thaw cycles well, but empty the bed of soil in harsh winters if you’re in Zone 3 or colder to prevent cracking. If leaving soil, mulch heavily (6+ inches) to insulate roots. Cedar’s natural flexibility also resists splitting better than other woods.
Wrapping up and next steps
Building a cedar raised bed is a rewarding investment—one that combines durability, natural beauty, and low-maintenance charm. With rot-resistant cedar framing and thoughtful design, your garden will thrive for decades with minimal upkeep.
Whether you're a seasoned gardener or just starting, this project is your ticket to a stunning, long-lasting growing space.
Ready to roll up your sleeves? Grab your tools, gather your materials, and start building! 🌱✨ For extra inspiration, explore custom cedar bed variations or share your progress with fellow gardeners—your green thumb is about to shine brighter than ever.