
Tools
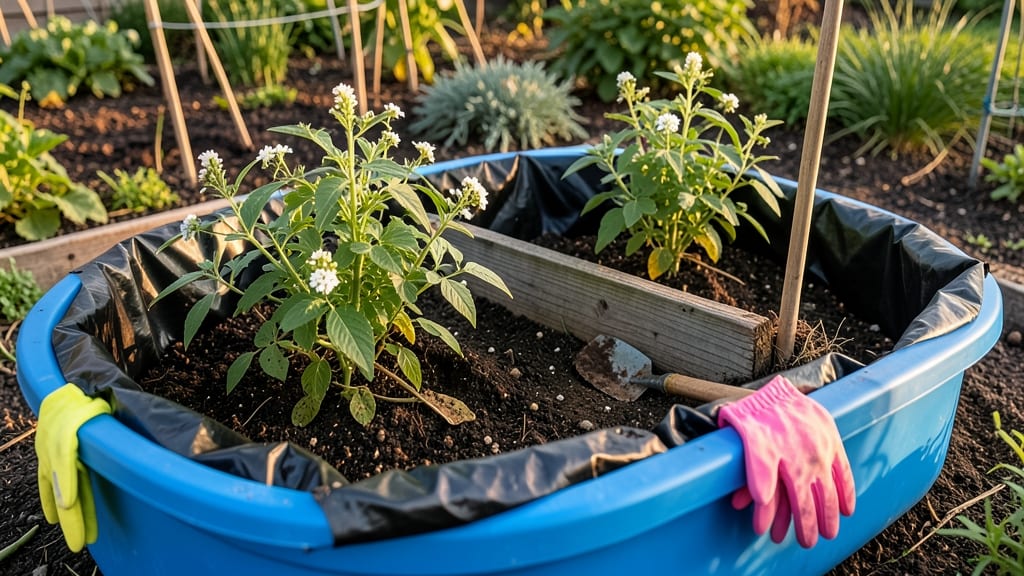
A kiddie pool raised bed garden turns plastic into a thriving, no-dig growing space that fits anywhere. 🌱 I never thought I'd grow zucchini in my backyard's corner until I repurposed an old pool—now it's my most productive patch, with zero bending or soil prep.
The beauty is in the simplicity: no heavy lumber, no digging, just a sturdy liner, drainage holes, and your favorite plants. My 4-foot pool grows tomatoes, peppers, and herbs year-round, even in partial shade. The key is matching plant needs to the pool's size and sunlight.
You'll end up with a garden that stays weed-free, drains well, and produces more than expected—especially when you add compost tea every few weeks. The best part? Moving it becomes a breeze if you need to shift spots.
Works for apartments, patios, or crowded backyards—just check your pool's weight limits and add casters if you plan to move it. Here's how to make it work without the usual hassle.
📚 In This Guide
- What you need
- Instructions
- Tips and common mistakes
- Wrapping up and next steps
What you need
- ● Kiddie pool: 1 (preferably 4-6 ft in diameter, with sturdy plastic or resin construction). Tip: Look for ones labeled "heavy-duty" for longevity!
- ● Garden fabric or landscape fabric: 1 roll (3-4 ft wide, enough to line the pool’s interior). Pro tip: This blocks weeds and preserves soil quality!
- ○ Garden soil or potting mix: 1-2 bags (2-3 cubic feet per bag, depending on pool size). Optional: Mix in compost for nutrient-rich soil!
- ● Drainage material: 1 bag of small gravel or landscape rocks (1-2 inches deep layer).
- ● Waterproof liner (if needed): 1 (if your pool isn’t already lined or has holes). Use a heavy-duty pond liner.
- ● Basic gardening tools: 1 hand trowel
- ● 1 garden rake (for leveling soil)
- ● 1 pair of gardening gloves
- ● Raised bed frame or wooden border: 1 (if you want to elevate the pool further or add stability). Use untreated cedar or redwood.
- ● Drip irrigation kit: 1 (for easy watering, especially in hot climates).
- ● Mulch: 1 bag (straw or shredded bark to retain moisture and suppress weeds).
- ● Solar-powered lights: 1-2 (to keep your garden glowing at night!).
- ● Seeds or seedlings: Your favorite veggies, herbs, or flowers! 🌻
Step-by-Step instructions for building a kiddie pool raised bed garden
Transform that old plastic kiddie pool into a thriving garden with these simple steps—no digging required!
🪴 Step 1: Clean and Prepare the Kiddie Pool
Start by giving your kiddie pool a thorough cleaning. Scrub out any algae, dirt, or debris with a stiff brush and warm, soapy water. Rinse it completely, then let it dry in the sun for at least 24 hours. This ensures no mold or bacteria remains that could harm your plants. I like to add a few drops of vinegar to the rinse water for extra disinfecting power.
Once dry, check for any cracks or sharp edges. Smooth down any rough spots with sandpaper or a file to prevent injury when working in the bed. If the pool has drainage holes, cover them with mesh or hardware cloth to keep critters out while still allowing excess water to escape. This step is critical—skipping it can lead to poor drainage or pests ruining your garden before it even starts.
☀️ Step 2: Line the Pool for Better Drainage and Soil Retention
Lay down a landscape fabric or thick cardboard at the bottom of the pool to prevent soil from washing out through drainage holes and to block weeds from growing up through the bottom. Overlap the edges by 6 inches and secure them with landscape staples. This creates a barrier that lasts the entire growing season without needing replacement.
Next, add a 2-3 inch layer of gravel on top of the fabric. This layer improves drainage and prevents soil compaction at the bottom of the pool. I use pea gravel because it’s lightweight and easy to work with, but any coarse gravel will do. Press it down gently but firmly—you want it to stay in place while still allowing water to flow freely through it.
🌱 Step 3: Fill With the Right Soil Mix
Fill the pool with a high-quality raised bed mix designed for vegetables or flowers. Avoid garden soil—it compacts too easily and drains poorly in containers. I fill my pool about 6-8 inches deep with soil, leaving 2-3 inches of space at the top for mulch and watering. This depth gives most vegetables and herbs enough room to grow strong roots without becoming root-bound.
After adding the soil, give it a gentle rake to level the surface. Press down lightly with your hands or a board to remove air pockets, but don’t compact it too much—you want the soil to stay loose and aerated. This is especially important for root vegetables like carrots or radishes, which need room to spread out.
💧 Step 4: Plant Your Garden and Water In
Arrange your plants according to their sunlight and spacing needs. Place taller plants like tomatoes or peppers at the back (or center) and shorter ones like lettuce or herbs around the edges. Follow the spacing guidelines on your seed packets or plant tags—crowding leads to weak, disease-prone plants. I like to use a small stick and string to mark rows before planting for neat, organized beds.
Water the soil deeply before planting to help settle it around the roots. After planting, give everything another thorough watering to remove air pockets and encourage root growth. Use a gentle spray or watering can to avoid disturbing the soil surface. This first watering is crucial—it helps your plants establish roots quickly and reduces transplant shock.
✂️ Step 5: Mulch and Maintain for Year-Round Growth
Spread a 2-3 inch layer of mulch on top of the soil to retain moisture, suppress weeds, and regulate soil temperature. I use straw or shredded leaves because they break down slowly and improve soil fertility over time. Keep the mulch 2 inches away from plant stems to prevent rot and pests from nesting too close to your plants.
Check the soil moisture daily during hot weather—kiddie pool gardens dry out faster than in-ground beds. Water deeply 2-3 times per week, depending on your climate, until the top 2 inches of soil feel moist. Avoid overhead watering after dark to reduce fungal diseases. With consistent care, your kiddie pool garden will thrive all season long, giving you fresh produce with minimal effort.
Tips & tricks for perfect kiddie pool raised bed gardens
Here's what nobody tells you about making your kiddie pool garden truly thrive.
Drying Time Matters: That 24-hour drying period in Step 1 is non-negotiable—skipping it risks introducing mold or bacteria that can stunt plant growth. Place the pool in full sun during this time, and if humidity is high, consider using a fan to speed up evaporation. I learned this the hard way after my first pool developed a musty smell that took weeks to eliminate.
Layering Secret: When adding the 2-3 inch gravel layer in Step 2, consider adding a thin layer of perlite or vermiculite mixed in with the gravel. This improves aeration even more, especially for root crops like potatoes. The key is to keep everything loose—compacted layers can create waterlogged pockets that invite rot.
Soil Depth Strategy: For the 6-8 inch soil depth in Step 3, I recommend adding a 1-2 inch layer of compost mixed into the bottom half of the soil. This creates a nutrient-rich zone where roots can access food immediately. Top with regular raised bed mix to prevent nutrient burn from over-concentrated compost near plant stems.
Planting Layout Hack: In Step 4, use the "square foot gardening" method to maximize space. Divide your pool into 1-foot squares and plant according to the square foot guide—this ensures proper spacing without guessing. For example, place 16 basil plants per square foot instead of crowding them. This method also makes rotation easier for next season.
Pro Tips for Kiddie Pool Raised Bed Garden
- Here's what nobody tells you about making your kiddie pool garden truly thrive.
- Drying Time Matters: That 24-hour drying period in Step 1 is non-negotiable—skipping it risks introducing mold or bac...
- Layering Secret: When adding the 2-3 inch gravel layer in Step 2, consider adding a thin layer of perlite or vermicul...
Frequently asked questions
Can I use any old kiddie pool for a raised bed garden?
Not all kiddie pools work—opt for heavy-duty, rigid plastic or resin pools (like those labeled for "commercial" use) that won’t warp or crack under plant weight. Avoid inflatable or soft-sided pools; they won’t hold soil or drainage properly. Check for UV resistance too, so your garden lasts beyond one season!
When is the best time to start a kiddie pool garden?
Spring (after the last frost) is ideal for planting, but you can prep the pool anytime—even winter! Start with soil prep in early spring, then plant warm-season crops (like tomatoes) after soil warms (test with a soil thermometer). For year-round growing, use row covers or cold frames in fall/winter.
How do I handle drainage in a kiddie pool raised bed?
Drainage is key! Drill 1–2 inch holes in the pool’s bottom (or sides if bottomless) and add a landscape fabric layer over them to prevent clogging. Elevate the pool on cinder blocks or bricks (4–6 inches high) to ensure water flows out. Avoid soggy roots by watering at the base, not overhead.
What plants thrive in a kiddie pool garden?
Stick to shallow-rooted, compact varieties like lettuce, herbs (basil, parsley), radishes, bush beans, or dwarf tomatoes. Avoid heavy feeders like corn or squash—they’ll outgrow the space. For vertical growth, try trellised cucumbers or peas to maximize space!
My kiddie pool garden is sagging—how do I fix it?
Sagging usually means the pool isn’t sturdy enough. Reinforce with internal supports (like PVC pipes or wooden stakes) or switch to a deeper, wider pool (12+ inches deep). If using a shallow pool, add a second layer of soil (up to 6 inches) and distribute weight evenly. For extreme cases, consider a wooden frame around the pool.
Wrapping up and next steps
Transforming a kiddie pool into a raised bed garden is a brilliant way to grow fresh produce with minimal effort—no digging, no backaches, and endless possibilities! 🌱 Whether you're a beginner or a seasoned gardener, this project proves that creativity and sustainability go hand in hand. Now that you’re armed with materials, answers to common questions, and step-by-step guidance, it’s time to roll up your sleeves and get planting!
Your next step? Start small—pick a sunny spot, gather your tools, and let your kiddie pool garden become the star of your backyard. Happy growing! 🌟